Introduction
Powerful slicing software for 3D printing aficionados is called PrusaSlicer. You may set up your 3D models for printing with PrusaSlicer and adjust the print settings for greater output and efficiency. This program is adaptable to various 3D printers, making it a useful tool for those interested in 3D printing. PrusaSlicer, which was created as an open-source project, has a variety of features and functionalities that set it apart from other slicers on the market.
Your 3D printing will turn out better if you use PrusaSlicer. The software’s sophisticated slicing algorithms can optimize the print settings for temperature, material utilization, and speed, leading to shorter print times and less material waste. Additionally, you may modify the print parameters with PrusaSlicer’s customizable settings, giving you total control over the printing procedure.
In conclusion, PrusaSlicer is a fantastic option if you’re seeking a strong slicing program that can unleash the full potential of your 3D printer. The PrusaSlicer is a useful tool for any 3D printing enthusiast thanks to its wealth of capabilities, adaptability to various printers, and open-source status.
PrusaSlicer overview and its importance in the 3D printing world
PrusaSlicer is a slicing software designed for 3D printing. This software takes a 3D model and converts it into a set of instructions that can be understood by a 3D printer, making it an essential tool in the 3D printing world.
PrusaSlicer is a popular choice among 3D printing enthusiasts due to its customizable settings and advanced slicing capabilities. With PrusaSlicer, users can adjust various print parameters such as temperature, speed, and layer height, to optimize the print quality and efficiency.
One of the significant advantages of PrusaSlicer is its compatibility with a wide range of 3D printers, making it an ideal choice for those who own multiple printers or those who are looking to upgrade their printer in the future. PrusaSlicer supports various types of printers, including Prusa printers, Ultimaker, and Creality, among others.
In conclusion, PrusaSlicer is a vital tool for any 3D printing enthusiast. Its advanced features and compatibility with different printers make it a popular choice in the 3D printing world. By using PrusaSlicer, users can unlock the full potential of their 3D printers and achieve better print quality and efficiency.
A brief history of PrusaSlicer and its Development
When Josef Prusa, a well-known personality in the 3D printing community, produced his first printer, the Prusa Mendel, in 2012, the development of PrusaSlicer got underway. As demand for his printers increased, he became aware of the necessity for a dependable and potent slicing program.
At first, Prusa utilized Slic3r, an open-source slicer, but he discovered that it lacked some of the functionality he required. As a result, he started creating his own slicing program, Slic3r PE (Prusa Edition).
Slic3r PE changed into PrusaSlicer over time, through numerous updates and enhancements. With its cutting-edge capabilities, simplicity of use, and compatibility with different 3D printers, PrusaSlicer is now a well-liked option among aficionados of 3D printing.
The open-source nature of PrusaSlicer is one of the factors contributing to its success. This implies that consumers can participate in the software’s creation, resulting in a product that is continually advancing and getting better. In addition, a community of 3D printing aficionados contributes input and ideas to the software’s development in order to make it better.
In conclusion, the demand for a dependable slicing program for Josef Prusa’s printers inspired the creation of PrusaSlicer. The program developed into the potent and adaptable slicing program we are familiar with over time. Those who are interested in 3D printing frequently choose it because of its open-source nature and community-driven growth.
PrusaSlicer’s compatibility with different 3D printer brands
One of the key advantages of PrusaSlicer is its compatibility with a wide range of 3D printer brands, including Prusa, Ultimaker, Creality, and more. This means that users can use PrusaSlicer to prepare their models for printing, regardless of the printer they own. PrusaSlicer’s compatibility with different printers is a result of its open-source nature, which allows for community contributions and updates. Additionally, PrusaSlicer supports various file formats, making it easier to import 3D models from different sources. In summary, PrusaSlicer’s compatibility with different 3D printer brands is a significant advantage, allowing users to make the most of their printers and achieve high-quality prints.
The open-source nature of PrusaSlicer and community contributions
Being open-source, PrusaSlicer’s source code is accessible to everyone and anybody can contribute to its development. As a result, a community of individuals interested in 3D printing has emerged, offering opinions, ideas, and even modifying the software’s source code. As a result, PrusaSlicer has developed into a strong and flexible slicing program with a wide range of features and capabilities. Software that meets the needs of 3D printing enthusiasts is continually changing and improving as a consequence of community contributions. Additionally, the open-source nature of PrusaSlicer guarantees that everyone, regardless of location or financial status, can use and access the program. In conclusion, PrusaSlicer’s growth has been greatly aided by community contributions, and is a popular choice among 3D printing aficionados because of its open-source nature.
PrusaSlicer Features and Functionalities
PrusaSlicer comes with several advanced features and functionalities that make it stand out from other slicing software. It supports multiple types of 3D printers, making it a versatile choice for 3D printing enthusiasts. Additionally, the software offers customizable print settings, allowing users to adjust various parameters such as layer height, infill density, and more. PrusaSlicer also features advanced slicing algorithms that help improve print quality and reduce print time. Moreover, the software comes with preview and repair tools, allowing users to preview their print and detect potential issues before printing. Other notable features include support for multiple languages, automatic bed leveling, and the ability to generate G-code files. In conclusion, PrusaSlicer’s advanced features and functionalities make it a top choice for 3D printing enthusiasts who are looking for reliable and versatile slicing software.
Compatibility with various 3D printers
PrusaSlicer’s compatibility with various 3D printers is a major advantage for 3D printing enthusiasts. The software supports a wide range of printer brands, including popular models from Creality, Anycubic, and Ultimaker. This allows users to easily prepare their models for printing, regardless of the printer they own. Additionally, PrusaSlicer supports various file formats, making it easier to import 3D models from different sources. PrusaSlicer’s compatibility with different printers is a result of its open-source nature, which allows for community contributions and updates. As a result, PrusaSlicer continues to evolve and adapt to the needs of 3D printing enthusiasts, ensuring that users can make the most of their printers and achieve high-quality prints. In summary, PrusaSlicer’s compatibility with various 3D printers is a significant advantage, making it a popular choice for 3D printing enthusiasts.
Customization of print settings
Customization of print settings is a key feature of PrusaSlicer that sets it apart from other 3D printing software. The software allows users to adjust various print parameters, such as layer height, infill density, and printing temperature, to achieve the desired print quality. Users can also create and save custom profiles for different types of prints or materials. PrusaSlicer’s user-friendly interface makes it easy to modify these settings, even for beginners. This level of customization gives users more control over their prints, resulting in higher quality and more efficient printing. Additionally, PrusaSlicer includes advanced features, such as the ability to add support structures or change the print order, which further enhances the customization options. Overall, PrusaSlicer’s robust customization options make it a powerful tool for achieving high-quality prints.
Advanced slicing capabilities
PrusaSlicer’s advanced slicing capabilities enable precise control over 3D printing parameters such as layer height, infill density, and support structures. The software also offers features such as variable layer heights, adaptive layer widths, and custom infill patterns. These capabilities result in improved print quality, reduced material waste, and faster printing times. Additionally, PrusaSlicer provides options for manual support placement and easy removal, making it a powerful tool for complex prints.
Preview and repair options
PrusaSlicer provides various preview and repair options to improve 3D printing. Its preview mode allows users to visualize the printed model and identify potential issues before printing. The software also includes a repair tool that automatically fixes common 3D printing problems, such as non-manifold models and intersecting faces. Additionally, users can customize support settings and add manual support structures. These features help ensure a successful print and reduce the likelihood of errors.
Comparing PrusaSlicer with other slicers
While there are several slicer software options available, let’s compare some popular ones with PrusaSlicer. Ultimaker Cura is known for its user-friendly interface, but PrusaSlicer offers more advanced features for experienced users. Simplify3D is a paid slicer software with good performance, but PrusaSlicer’s open-source nature and community support make it a more accessible option. Slic3r and KISSlicer are both open-source slicer software, but PrusaSlicer’s user interface and ease of use set it apart. See the table below for a side-by-side comparison of key features:
| Feature | PrusaSlicer | Ultimaker Cura | Simplify3D | Slic3r | KISSlicer |
|---|---|---|---|---|---|
| Open-source | Yes | Yes | No | Yes | Yes |
| Community support | Yes | No | No | Yes | No |
| User interface | Intuitive | User-friendly | Good | Complex | Complex |
| Advanced features | Yes | No | Yes | Yes | Yes |
| Cost | Free | Free | $149 | Free | Free |
Key Benefits of Using PrusaSlicer
The advantages of PrusaSlicer are numerous for those who enjoy 3D printing. First of all, anyone can use it because it is free and open source. Second, it boasts an intuitive user interface with a wealth of sophisticated features and functionalities. It is versatile in that it supports a range of 3D printers. PrusaSlicer is a complete 3D printing software package that also includes print setting customization, preview and repair options, and extensive slicing capabilities. Overall, PrusaSlicer offers a flawless 3D printing experience and is a useful tool for both pros and hobbyists.
Enhancing print quality and reliability
PrusaSlicer offers several features that can help enhance the quality and reliability of 3D prints. It allows for easy customization of print settings such as layer height, infill density, and support structures. The preview function allows users to visualize their prints before actually printing them. Additionally, PrusaSlicer’s automatic repair function can fix common mesh errors that can affect print quality. Its advanced slicing capabilities can also optimize print times and reduce material waste. All of these features work together to improve the overall print quality and reliability of 3D prints.
Speeding up printing times
PrusaSlicer offers several features to speed up printing times. The software allows users to adjust print settings such as layer height, infill density, and print speed. Additionally, users can take advantage of the variable layer height feature to increase print speed while maintaining print quality. PrusaSlicer also includes a tool for optimizing the print path to reduce the print time, and the software can automatically generate support structures to speed up print preparation. Overall, PrusaSlicer’s customizable settings and optimization tools make it an effective choice for speeding up printing times.
Minimizing material waste and cost
Printing with minimal material waste and cost is crucial for both personal and professional 3D printing projects. With the use of advanced features such as customizable support structures and optimized infill, PrusaSlicer can minimize material waste and reduce printing costs. Additionally, the software includes a filament cost calculator to estimate the cost of each print, enabling users to make informed decisions about material usage. These features not only save money but also contribute to a more sustainable and eco-friendly approach to 3D printing.
Examples and evidence supporting the benefits
- PrusaSlicer’s customizable print settings have been shown to improve print quality and accuracy, as demonstrated by various 3D printing enthusiasts and professionals.
- Using PrusaSlicer’s advanced slicing features, such as the ability to adjust support placement and infill density, can significantly reduce printing times without sacrificing quality.
- The software’s built-in repair and preview tools can catch potential printing issues before they occur, minimizing material waste and saving costs.
- Many users have reported that using PrusaSlicer has improved the overall reliability and consistency of their 3D prints, leading to fewer failed prints and less frustration.
- Overall, the open-source and community-driven nature of PrusaSlicer allows for continual development and improvement, ensuring that users have access to the latest and most effective tools for their 3D printing needs.
Step-by-Step Guide on How to Use PrusaSlicer
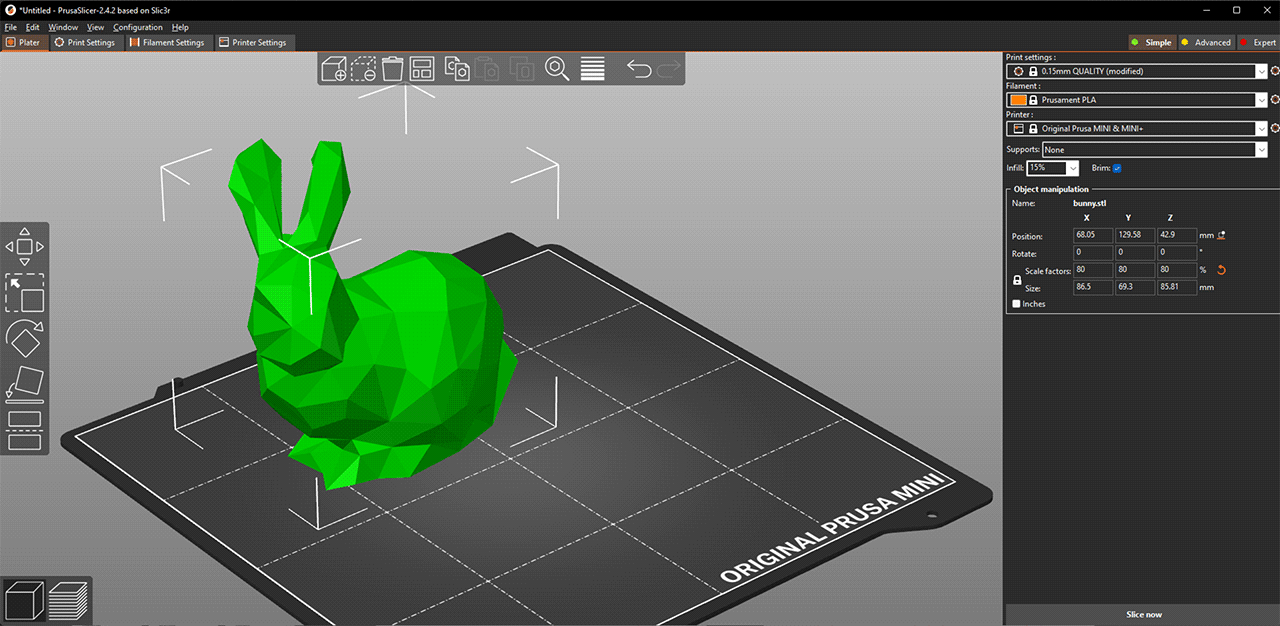
A step-by-step tutorial on how to use PrusaSlicer is provided in this part. We’ll go over a number of essential features of the program, such as configuring a printer profile, importing a 3D model, changing print settings, slicing the model, previewing the print, and exporting the G-code. To make things simple for beginners to comprehend and follow, we will describe each step in simple words. You will have a solid understanding of using PrusaSlicer to set up your 3D printing at the end of this guide.
Importing a 3D model file
PrusaSlicer’s “Add” button must be clicked, then “Add Model” must be chosen in order to import a 3D model file. Select your 3D model file by navigating to its location. The file can also be dropped right into the PrusaSlicer window by dragging it there. The 3D preview window will display the file after it has been loaded. The model’s location, rotation, and scale can then be changed to suit your tastes. To prevent any printing troubles, it is crucial to make sure the model is properly positioned on the print bed.
Adjusting print settings for optimal results
Adjusting print settings is crucial to achieving optimal results when using any 3D printing software. In PrusaSlicer, users have the ability to adjust a variety of settings such as print speed, layer height, and infill density. Additionally, PrusaSlicer provides presets for various materials, making it easier to choose the right settings for the desired material. With these options, users can fine-tune their prints to achieve the best possible quality and avoid issues such as stringing or warping.
Previewing and optimizing the print layout
Previewing and optimizing the print layout is an important step in 3D printing. By using software like PrusaSlicer, you can see a preview of the model and adjust the layout to optimize the print quality and reduce printing time. The software allows you to rotate and scale the model, choose the print bed size, and arrange multiple models on the bed for batch printing. You can also adjust the print settings for each individual model and preview the result to ensure optimal results. By optimizing the print layout, you can minimize material waste and save printing time and cost.
Generating the G-code file for printing
The last step before printing is to generate the G-code file. In order to do this, you must choose the right printer and configure printing options like layer height, infill density, and print speed. You can create the G-code file, which is a collection of instructions that tells the printer how to print the object, after you have customized the parameters to your desire. The G-code file can then be transmitted straight to the printer via USB or saved on an SD card. Review the G-code file carefully before printing to make sure everything is configured properly and to make any necessary corrections. This procedure is simple and user-friendly with PrusaSlicer, enabling you to quickly create high-quality G-code files for your 3D printing.
Visual aids, such as screenshots or videos
The learning process for using PrusaSlicer can be substantially improved by visual aids like screenshots or movies. Videos can provide a step-by-step demonstration, while screenshots offer a visual reference to follow along with. People who are new to 3D printing or who might not be familiar with the program can benefit the most from these tools. Users can more readily comprehend the many PrusaSlicer capabilities and settings by using visual aids in tutorials and guides, which will improve prints and make printing more enjoyable. Visual aids can also be a helpful tool for resolving any problems that can come up throughout the printing process.
Conclusion
In conclusion, PrusaSlicer is a powerful and user-friendly software that offers numerous benefits for 3D printing enthusiasts. Its features and capabilities allow for enhanced print quality and reliability, faster printing times, and reduced material waste and costs. By following the step-by-step guide and adjusting print settings, users can achieve optimal results. Visual aids, such as screenshots and videos, can further assist in the learning process. Overall, PrusaSlicer is a valuable tool for both beginners and experienced 3D printing enthusiasts.
Recap of the main points covered in the blog post
In this blog post, we discussed the benefits of using slicing software for 3D printing and specifically highlighted the advantages of using PrusaSlicer. We covered topics such as adjusting print settings, previewing and optimizing print layout, generating G-code files, and using visual aids to aid in the printing process. We also provided a step-by-step guide on how to use PrusaSlicer and showcased examples and evidence supporting its benefits. By using PrusaSlicer, users can enhance print quality, reliability, and speed, while minimizing material waste and cost. In conclusion, PrusaSlicer is a powerful tool for optimizing 3D printing and can greatly improve the printing process for both beginners and experienced users.
The significance of PrusaSlicer for 3D printing enthusiasts
PrusaSlicer is a free and open-source slicing software that has become a popular choice among 3D printing enthusiasts. It offers advanced features for adjusting print settings, optimizing print layout, and generating G-code files. PrusaSlicer has a user-friendly interface, making it easy to use for both beginners and experienced users. The software also supports a wide range of 3D printers and filament types, making it a versatile tool for 3D printing enthusiasts. Its ability to enhance print quality and reliability, speed up printing times, and minimize material waste and cost have made it an essential tool in the 3D printing community. Overall, PrusaSlicer has significantly contributed to the growth and advancement of 3D printing technology.
How can I minimize material waste when printing with PrusaSlicer?
- Select a suitable infill density for your model
Set the infill density to an appropriate value based on the structural needs of your model. A lower infill density can reduce material usage.
- Adjust the layer height
Adjusting the layer height can help reduce material waste, as using thinner layers results in finer details and less material usage.
- Modify the print speed
Increasing the print speed can help reduce material usage as the nozzle spends less time extruding plastic.
- Enable variable layer height
Variable layer height can help reduce material waste by automatically adjusting the layer height based on the complexity of the model.
- Enable the cooling fan
enabling the cooling fan can help prevent material waste by ensuring that the filament cools quickly and evenly, reducing the likelihood of warping or other issues.
- Optimize support structures
Using efficient support structures can help reduce material waste, as well as make it easier to remove them after printing.
- Use a skirt or brim
Using a skirt or brim can help minimize material waste by ensuring that the filament is flowing smoothly before the actual print begins.
FAQs
PrusaSlicer is a free and open-source slicer software designed for 3D printing. It is developed by Prusa Research, and its main difference from other slicers is its user-friendly interface, extensive customization options, and advanced features.
PrusaSlicer is not limited to Prusa printers and can be used with any 3D printer that accepts G-code.
PrusaSlicer offers a range of advanced features and customization options, making it ideal for 3D printing enthusiasts who want to maximize print quality and minimize material waste. It also has an easy-to-use interface and is free and open-source.
PrusaSlicer offers advanced features such as manual placement of models, automatic arrangement of multiple models, and infill optimization to minimize material waste and improve print quality.
PrusaSlicer allows users to generate G-code files for their 3D printers by selecting the appropriate printer and filament settings, arranging the models on the print bed, and exporting the G-code file.