Introduction to 3D Printing Troubleshooting
Manufacturing and prototyping have been transformed by 3D printing, but like any technology, it has its share of drawbacks. Gaining proficiency in 3D printing troubleshooting is necessary for obtaining reliable, premium results. We will talk about the significance of comprehending and resolving typical 3D printing problems in this introduction.
3D printing troubleshooting entails locating the source of issues and putting good fixes in place. Your 3D printing projects can run more efficiently overall by taking a proactive approach to troubleshooting. You’ll be better prepared to tackle any difficulties that may emerge during your 3D printing initiatives if you learn about typical problems and how to fix them.
You’ll run into a variety of problems as you go deeper into the world of 3D printing troubleshooting, from simple annoyances to more difficult problems. Warping, poor adhesion, clogged nozzles, and print quality concerns are a few typical issues. Any 3D printing enthusiast or professional should have a solid understanding of how to solve these issues.
In conclusion, dealing with this cutting-edge technology requires an understanding of 3D printing troubleshooting. You can master the art of 3D printing troubleshooting and create excellent prints by being familiar with typical problems and discovering how to fix them. In the following sections of this comprehensive tutorial, we’ll cover numerous 3D printing difficulties and their remedies.
Understanding Common 3D Printing Problems
It’s important to comprehend the typical issues that customers frequently run across before delving into the world of 3D printing troubleshooting. By being aware of these problems, you can solve them right away for a smoother and more effective printing process. This section will examine several typical 3D printing issues, illuminating their root causes and providing practical fixes to assist you in maintaining the highest print quality.
Warping of the Print Bed
Warping occurs when a printed object’s corners or edges lift off the print bed, causing the object to become distorted or misshapen. This common issue is often identifiable during or immediately after the printing process. It can significantly affect the final quality and appearance of the printed object, making it essential to address promptly.
The primary cause of warping is the uneven cooling of the printed layers. As the material cools, it contracts, and when different areas of the print cool at different rates, the object’s shape is compromised. Materials like ABS are particularly prone to warping due to their higher shrinkage rates when cooling.
To prevent warping, try these solutions: ensure the print bed is level and clean, increase bed temperature to promote better adhesion, and use a brim or raft to provide additional support. Enclosing the printer to maintain a consistent ambient temperature can also help. By implementing these measures, you can minimize the risk of warping and achieve higher-quality prints.
Poor Adhesion of the Filament to the Bed
Poor adhesion of the filament to the print bed is a common issue that results in prints detaching from the bed or shifting during the printing process. This problem can lead to failed prints, wasted filament, and an overall frustrating experience. Identifying poor adhesion is relatively simple, as the print will often not stick to the bed or will become dislodged during printing.
The causes of poor adhesion can vary, but common factors include an unclean or uneven print bed, incorrect bed temperature, improper nozzle distance from the bed, or the use of an unsuitable bed surface. Additionally, the type of filament being used can also play a role, as some materials are more challenging to adhere to the print bed than others.
To improve adhesion, start by ensuring the print bed is clean and free of any debris or residue. Adjust the bed temperature according to the filament being used, and fine-tune the nozzle height to achieve optimal adhesion. Consider using a build surface or adhesive specifically designed for 3D printing to enhance bed adhesion. With these adjustments, you can effectively address poor adhesion and achieve successful prints.
Clogged or Blocked Nozzles
Clogged or blocked nozzles are a common issue that can disrupt the 3D printing process and negatively affect print quality. A clogged nozzle is often characterized by uneven extrusion, under-extrusion, or complete lack of filament flow. Identifying this issue early is crucial to avoid wasting time and filament on failed prints.
Nozzle clogs can be caused by several factors, including the presence of foreign particles in the filament, using filament with inconsistent diameter, or printing at an incorrect temperature. Additionally, residue from previous prints can build up and cause blockages, especially when switching between different filament materials.
To resolve a clogged nozzle, start by performing a cold pull or “atomic pull” to remove any debris from the nozzle. If the clog persists, try using a fine needle or nozzle cleaning tool to clear the blockage. Ensuring proper printing temperatures and using high-quality filament can also help prevent clogs. Regularly inspect and clean your nozzle to maintain optimal print quality and avoid future blockages.
Layer Shifting or Misalignment during Printing
Layer shifting or misalignment during printing occurs when the layers of a print do not line up correctly, resulting in a skewed or distorted final product. This issue is usually noticeable during the printing process, as the print’s structure will appear misaligned or slanted compared to the intended design.
The causes of layer shifting can include loose belts or pulleys, incorrect stepper motor settings, or even collisions between the print head and the object being printed. Additionally, improper lubrication of the printer’s moving parts, or objects on the print bed interfering with the print head’s motion, can contribute to this issue.
To fix layer shifting, start by inspecting and tightening any loose belts or pulleys, ensuring the printer’s moving parts are properly lubricated, and removing any obstructions on the print bed. Adjust the stepper motor settings as needed to ensure smooth and accurate movement. Calibrating the printer and performing regular maintenance can also help prevent layer shifting and improve overall print quality. By addressing these potential causes, you can achieve well-aligned and accurate 3D prints.
Over-Extrusion or Under-Extrusion of the Filament
Over-extrusion and under-extrusion are common issues that can negatively impact the quality of 3D-printed objects. These issues occur when the printer extrudes too much or too little filament, respectively. 3D printing troubleshooting for extrusion problems is essential to achieving consistent, high-quality prints. Identifying these issues early on can help prevent print failures and save time and materials.
Over-Extrusion of the Filament
Over-extrusion occurs when the printer pushes out more filament than necessary, resulting in a messy, blob-like appearance. This issue can lead to uneven layers, poor surface quality, and even print failures. To spot over-extrusion, look for excess material on the print’s surface or layers that are thicker than they should be.
The primary cause of over-extrusion is an incorrect extrusion multiplier or flow rate setting in the slicer software. Other factors that can contribute to this issue include incorrect filament diameter, worn-out extruder gears, and an improperly calibrated extrusion system.
To resolve over-extrusion, first, ensure that the correct filament diameter is set in the slicer software. Next, check and adjust the extrusion multiplier or flow rate as needed. Inspect the extruder gears for wear and replace them if necessary. Finally, calibrate the extrusion system following the manufacturer’s guidelines to ensure consistent filament flow.
Under-Extrusion of the Filament
Under-extrusion is a common issue in 3D printing where the printer extrudes less filament than needed, resulting in weak, brittle prints with visible gaps between layers. Identifying under-extrusion involves looking for thin, incomplete layers, weak infill, and overall lack of material in the printed object.
The main causes of under-extrusion include an incorrect extrusion multiplier or flow rate setting, clogged nozzles, insufficient filament feed, and a faulty extruder motor. Other factors, such as improper temperature settings or low-quality filament, can also contribute to this problem.
To fix under-extrusion, start by checking the extrusion multiplier or flow rate in the slicer software and adjust as needed. Inspect and clean the nozzle to remove any blockages, ensuring smooth filament flow. Verify that the filament spool is properly feeding into the extruder and that the extruder motor is functioning correctly. Lastly, double-check temperature settings and consider switching to a higher-quality filament to improve print quality.
Filament Jams or Tangles
Filament jams or tangles occur when the filament gets stuck or tangled within the extruder or on the spool, leading to printing issues or complete print failure. Identifying these issues involves noticing sudden stops in extrusion, irregular filament flow, or visible tangles on the spool.
The causes of filament jams or tangles can include poor filament spool winding, improper filament feed, or debris inside the extruder. Additionally, an incorrect nozzle temperature, damaged PTFE tubing, or a misaligned extruder gear can lead to jamming or tangling.
To resolve filament jams or tangles, first, inspect the spool for proper winding and make sure it can rotate freely. Check the filament feed system for any obstructions or misalignments, and clean the extruder to remove any debris. Adjust the nozzle temperature according to the filament material, and replace any damaged PTFE tubing. Ensure the extruder gear is properly aligned and functioning, and maintain regular cleaning and maintenance to prevent future jams or tangles.
Print Quality Issues
3D printing troubleshooting also includes addressing print quality issues such as banding, ghosting, and Z-banding. These common problems can affect the appearance and accuracy of printed objects. In this section, we’ll discuss the causes, identification, and solutions for these issues to achieve better print quality.
Banding
Banding refers to horizontal lines or patterns that appear on 3D printed objects. These lines may be consistent or irregular and can negatively impact the print’s aesthetics and functionality. Identifying the issue through visual inspection is the first step to address it.
The main cause of banding is inconsistent extrusion, which can result from various factors. These include uneven filament diameter, temperature fluctuations, or issues with the extruder or print bed. Other potential causes are mechanical vibrations, imprecise stepper motor movements, or loose belts and pulleys.
To resolve banding, start by checking the filament quality and consistency. Ensure the extruder temperature remains stable during printing and consider upgrading to a higher quality extruder or hotend. Inspect the printer’s mechanical components, such as belts and pulleys, for wear or looseness, and tighten or replace them if necessary. Additionally, adjusting the printer’s acceleration and jerk settings can help minimize vibrations and improve print quality.
Ghosting
Ghosting, also known as ringing or echoing, appears as faint copies or artifacts of sharp edges and corners on a 3D-printed object. These unwanted artifacts can detract from the print’s overall appearance and precision. Visual inspection of the print will reveal the presence of ghosting.
The primary cause of ghosting is excessive vibrations in the printer’s frame, resulting from rapid changes in direction during printing. These vibrations can be amplified by loose or worn-out mechanical components, such as belts, pulleys, or bearings. Additionally, improper print settings, like high acceleration or jerk values, can exacerbate the issue.
To address ghosting, start by inspecting and tightening all mechanical components. Replace worn-out parts if necessary. Adjust the print speed, acceleration, and jerk settings to minimize vibrations during printing. Using a more rigid frame or installing vibration dampeners can also help reduce ghosting. Finally, consider upgrading the printer’s firmware or using slicing software with better motion control algorithms to improve print quality.
Z-Banding
Z-banding, also known as z-wobble or z-ribbing, is a common 3D printing issue that results in uneven layers and visible horizontal bands on the printed object. This issue can compromise the aesthetics and structural integrity of the final print. Examine the printed object for regular horizontal lines or uneven layer heights to identify z-banding.
The main cause of z-banding is mechanical inconsistencies in the printer’s z-axis movement. This can be due to bent or misaligned lead screws, worn-out or loose couplings, and unevenly lubricated or dirty linear rails. Additionally, temperature fluctuations during printing can cause uneven material shrinkage, further contributing to the problem.
To resolve z-banding, first inspect the z-axis components for wear, misalignment, or damage, and make necessary adjustments or replacements. Ensure that lead screws and linear rails are clean and well-lubricated. Check the couplings for tightness and replace if worn. Maintain a consistent temperature during printing to minimize material shrinkage issues. Lastly, consider upgrading to high-quality lead screws or ball screws to improve z-axis stability and accuracy.
Advanced 3D Printing Issues
In advanced 3D printing troubleshooting, there are several issues that can arise such as stringing, elephant foot, cracking, and rough or grainy surface finishes. These issues can be frustrating, but there are solutions to fix them.
Stringing
Stringing is a common issue in 3D printing where small strands of filament are left between printed parts. This can be identified by the appearance of these strands between the printed parts.
The primary cause of stringing is the excessive melting of the filament during printing, which causes it to become more fluid and prone to dripping. This can be caused by a high printing temperature, slow print speeds, or incorrect retraction settings.
To prevent stringing, it is recommended to lower the printing temperature, increase print speed, and adjust retraction settings. Another method is to use a specialized slicer program that includes a feature called “retraction extra prime amount,” which allows the printer to add an extra amount of filament before retracting, helping to prevent stringing.
Elephant Foot
Elephant Foot is a 3D printing issue where the first layer of the printed object appears wider than the rest, causing the bottom of the object to have a flattened or distorted appearance. The problem is identified by observing the base of the printed object, which has a larger surface area than intended.
The main reason for Elephant Foot is improper bed leveling or excessive pressure during the first layer of the print. The extruder nozzle presses too hard against the bed, causing the first layer to spread out more than intended. This can also occur if the print bed is not clean, causing the filament to stick too much to the surface.
To solve the problem of Elephant Foot, proper bed leveling is essential. Adjust the bed height so that the nozzle distance from the bed is appropriate for the first layer. Another solution is to reduce the printing speed and increase the distance between the nozzle and bed during the first layer. Also, using a different bed surface or applying adhesive material can prevent the filament from sticking too much and causing Elephant Foot.
Cracking
Cracking is a common issue in 3D printing that can occur during or after the print. It is characterized by the appearance of small or large cracks on the surface of the print, which can weaken its structure and cause it to break.
Several factors can contribute to cracking in 3D printing. One of the most common causes is the use of incorrect temperature settings for the printing material. Additionally, rapid cooling of the printed part or exposure to external stresses such as bending or twisting can also cause cracking.
There are several methods for solving cracking issues in 3D printing. One effective solution is to adjust the temperature settings for the printing material to prevent overheating or rapid cooling. Another approach is to modify the printing speed or cooling settings to ensure that the print is not exposed to unnecessary external stresses. In some cases, adding support structures or modifying the design of the print can also help to prevent cracking issues.
Rough or Grainy Surface Finish
A rough or grainy surface finish is a common problem in 3D printing that can occur for various reasons. The surface of the print appears bumpy or uneven and lacks smoothness. This problem can occur in different areas of the print, such as the top or bottom layer, or in specific sections.
The main cause of a rough or grainy surface finish is usually due to incorrect printer settings or issues with the filament. The nozzle temperature might be too high, causing the filament to melt excessively and create bumps on the surface. Another possible cause is an incorrect retraction setting, which can cause the filament to remain on the surface between layers. Poor quality filament with inconsistent diameter or composition can also result in a rough surface finish.
To fix the rough or grainy surface finish, the first step is to ensure that the printer settings are correct. Check the temperature settings, retraction settings, and layer height. If the problem persists, try changing the filament and adjusting the printing speed. Also, try increasing the cooling fan speed, which can help to solidify the layers and improve the surface finish. If none of these solutions work, consider upgrading the printer or trying a different printing technique.
Delamination
Delamination is a 3D printing issue that occurs when the layers of a printed object start to separate from each other. This can result in a weak and brittle final product that lacks the necessary structural integrity.
The most common cause of delamination is inadequate bonding between the layers of the object. This can be due to a variety of factors such as improper temperature settings, insufficient layer adhesion, or poor-quality filament. Another factor can be related to the design of the object itself, with certain shapes and structures being more prone to delamination.
To address delamination, it is important to first identify the cause of the problem. This can involve adjusting temperature and humidity settings, improving layer adhesion through the use of adhesives or increasing print bed adhesion, and using higher-quality filaments. Properly designing the object with thicker walls and infill can also help to prevent delamination.
Overhangs and bridges
Overhangs and bridges are two of the most challenging features to print in 3D printing. The problem usually presents itself in the form of inaccurate or sagging structures.
The reason for this problem is due to the laws of physics. Overhangs and bridges need to be printed without any support material. In traditional printing, the bottom layers provide support for the top layers. However, in 3D printing, the layers are printed on top of each other, and the previous layer needs to be solidified before the next one is printed. This process leads to drooping or sagging.
To solve this issue, several methods can be implemented. Increasing the cooling fan speed can help solidify the material quicker, providing better support for the overhangs and bridges. Decreasing the print speed can also help to reduce the amount of drooping. Lastly, printing at a lower temperature can prevent the material from becoming too soft, reducing the likelihood of sagging.
Z-Scar
Z-Scar is a visible line that appears on the surface of 3D-printed objects. It is usually located on the sides of the print and is caused by the movement of the printer’s nozzle between layers.
The primary cause of Z-Scar is the movement of the printer’s nozzle between layers. This movement can result in a small amount of material being extruded and deposited on the surface of the print, creating a visible line. Another common cause is the retraction of the printer’s filament, which can cause the material to be pulled back and then deposited on the surface of the print as the nozzle moves to the next layer.
There are several ways to reduce or eliminate the appearance of Z-Scar on 3D-printed objects. One solution is to adjust the printer’s settings to minimize the amount of material extruded during nozzle movement or filament retraction. Another approach is to use specialized software to automatically add small offsets to the print path, so the nozzle does not move in the same location between layers. Finally, changing the orientation of the print can also help minimize the appearance of the Z-Scar.
Pillowing
Pillowing is a problem that causes the surface of the 3D-printed object to have a wavy, pillow-like appearance. This problem is typically seen on the top layer of the print. The appearance of the wavy surface is caused by the print not having enough material to fill in gaps or holes.
The main cause of pillowing is improper cooling of the material during the printing process. As the printer head moves across the top layer of the print, it can cause the material to melt and become more fluid, leading to gaps and holes. Additionally, if the printer is printing too quickly, it may not have enough time to properly cool the material, leading to pillowing.
To solve the problem of pillowing, the printer can be adjusted to slow down the print speed or to use a higher print temperature. Additionally, using a cooling fan or adding more supports to the print can help ensure that the material has enough time to cool and properly fill in gaps and holes.
Effective 3D Printing Troubleshooting Techniques
3D Printing Troubleshooting is an essential skill for any 3D printing enthusiast. Effective troubleshooting techniques involve a systematic approach to identifying and solving common problems such as filament jams, under/over-extrusion, and warping. By understanding the root causes of these issues and employing effective techniques such as adjusting print settings, calibrating the printer, and using appropriate support structures, troubleshooting becomes an efficient process that can greatly improve the quality of 3D prints.
Check the filament quality and condition
Start by examining the filament’s quality and condition to troubleshoot 3D printing issues. Make sure it is dry and clear of moisture, dust, and debris. Additionally, make sure the filament’s diameter and consistency are within the advised range. Using damaged or poor-quality filament can result in a number of printing problems.
Verify the extruder and hotend temperature settings
It’s crucial to confirm that the extruder and hotend temperature settings are right before beginning a 3D printing troubleshooting process. Under-extrusion, blockages, and other associated problems can be avoided by making sure the temperature is set correctly. A temperature check can also reveal whether the printer is heating up or cooling down too slowly, which can affect the quality of prints.
Level the build plate and adjust the Z-axis height
To troubleshoot 3D printing issues, it’s important to level the build plate and adjust the Z-axis height to ensure proper bed adhesion and filament flow. This can prevent issues such as warping, bed adhesion problems, and stringing.
Calibrate the extruder and filament flow rate
It’s crucial to calibrate the extruder and filament flow rate before troubleshooting 3D printing problems. To provide precise and consistent results, this entails regulating the volume of plastic extruded during the printing process. Extruder and flow rate calibration can assist avoid issues like under- or over-extrusion, weak layer adhesion, and other typical printing concerns.
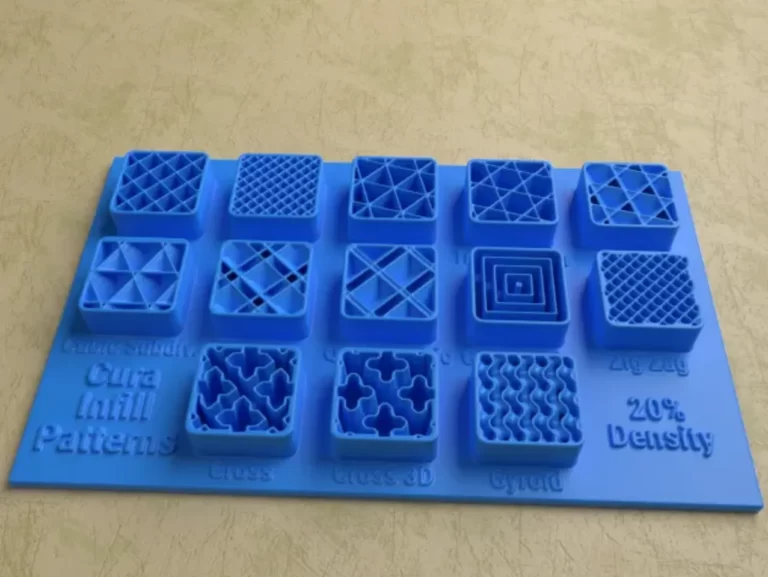
Adjust the print speed, layer height, and infill density
Adjusting print speed, layer height, and infill density might be useful for troubleshooting 3D printing problems. It’s crucial to modify these parameters in accordance with the particular requirements of the object being printed because they can have an impact on the print’s overall accuracy and quality. Many problems, including stringing, under extrusion, and warping, can be rectified by modifying these settings.
Clean the printer and check for any loose parts or connections
Checking for buildup or dirt inside the printer and making sure all components are firmly linked and secure are also crucial steps in troubleshooting 3D printing problems. It’s crucial to check for any faults before continuing a print because loose parts or connections can interfere with printing. Regular printer maintenance can also avoid buildup and guarantee that the printer is operating effectively.
Use support structures for complex prints
When printing complex models, using support structures can help prevent issues such as stringing and warping. These structures are temporary and are designed to hold up overhanging parts of the model during printing. They can be generated automatically by the slicing software, and it is important to remove them carefully after printing to avoid damaging the final product.
Optimize the model orientation and slicing settings
Optimizing the model orientation and slicing settings can greatly improve 3D printing quality. These settings can affect print speed, accuracy, and strength. Proper orientation can minimize the need for supports and improve overall strength while slicing settings can affect layer adhesion and surface finish. Taking the time to adjust these settings can greatly improve print quality and reduce the need for troubleshooting.
Try different types of filament or brands
Try experimenting with other filament types or brands if you are having problems with your 3D printing. This can assist you in figuring out whether the problem stems from the particular filament you were using, such as poor quality or inconsistent diameter. Additionally, experimenting with various materials can help you optimize your printing process because various filament types may require various printing parameters.
Update the firmware and software to the latest versions.
Updating the firmware and software can help to resolve various 3D printing issues. It’s important to check for the latest versions and install updates when available to ensure optimal performance and compatibility.
Tips for Maintaining Your 3D Printer
- Keep your printer clean and free of dust and debris.
- Use high-quality filament and store it properly.
- Regularly check and calibrate the bed leveling and Z-axis height.
- Maintain and lubricate the moving parts, such as the rods and belts.
- Use the appropriate slicing settings for each print.
- Check for loose connections and parts before each print.
- Use support structures for complex prints to prevent failure.
- Keep your firmware and software up to date.
- Monitor your prints to catch issues early on.
- Seek help from online communities and resources when troubleshooting.
Conclusion: Mastering the Art of 3D Printing Troubleshooting
After troubleshooting your 3D printer, it’s important to reflect on what you’ve learned and how you can continue to improve your printing experience. Here are some key takeaways:
- Regular maintenance and upkeep can prevent many common printing issues.
- Troubleshooting requires patience and a methodical approach to identifying the root cause of the problem.
- Understanding your printer’s settings and how they impact the print can lead to better results.
- Experimenting with different filaments, settings, and models can help you discover what works best for your specific needs.
- Don’t be afraid to ask for help or seek out additional resources, such as online forums or manufacturer support.
By mastering the art of 3D printing troubleshooting, you can enjoy a smoother and more successful printing experience. Remember to stay curious, patient, and persistent in your pursuit of perfect prints.
How do troubleshoot and fix common 3D printing errors?
- Check the Print Bed Level
Ensure the print bed is level to prevent any printing issues. Adjust the bed if necessary.
- Verify the Extruder and Hotend Temperature Settings
Ensure the printer is set to the correct temperature for the filament type being used.
- Calibrate the Extruder and Filament Flow Rate
Make sure the extruder is calibrated to ensure proper filament flow and prevent under/over extrusion.
- Adjust the Print Speed, Layer Height, and Infill Density
Fine-tune these settings to ensure optimal print quality and strength.
- Clean the Printer and Check for Any Loose Parts or Connections
Ensure that the printer is free of any debris or dust that could affect the print quality. Check for any loose parts or connections.
- Use Support Structures for Complex Prints
For more complex prints, support structures may be necessary to prevent warping or print failures.
- Optimize the Model Orientation and Slicing Settings
Proper orientation and slicing settings can make a big difference in the final print quality.
- Try Different Types of Filament or Brands
Sometimes changing the filament type or brand can solve printing issues.
- Update the Firmware and Software to the Latest Versions
Keeping the printer’s firmware and software up to date can fix bugs and improve performance.
- Check the Quality of the STL File
Ensure the STL file being used is of high quality and not causing any issues during the slicing process.
FAQs
The most common 3D printing errors include uneven or incomplete layers, warping, stringing, and under-extrusion.
Under-extrusion is typically caused by a clogged or partially blocked nozzle, incorrect temperature settings, or a worn-out or incorrectly calibrated extruder.
To fix warping, try adjusting the bed temperature, adding a brim to your print, using a different type of filament, or ensuring the print bed is clean and level.
To prevent stringing, try adjusting the retraction settings in your slicer software, lowering the print temperature, or using a higher-quality filament.
To troubleshoot layer adhesion issues, ensure that the bed is level, increase the bed temperature, slow down the print speed, or consider using a bonding agent such as hairspray or glue stick.
To improve print quality, consider optimizing your slicer settings, using high-quality filament, ensuring the bed is level and clean, and regularly maintaining your 3D printer.