Introduction
Manufacturing, prototyping, and design have all been transformed by 3D printing. Now that 3D printer kits are readily available, anyone may make complex objects in the comfort of their own home. We’ll dive into the intriguing world of 3D printer kits in this post and provide you with the knowledge you need to let your creativity soar.
We will discuss a variety of topics of 3D printer kits, such as their advantages, essential elements, and how to pick the best kit for your requirements. You will be well-prepared to begin your own 3D printing journey once you have a firm understanding of 3D printer kits.
Briefly introduce 3D printing technology and its advancements
3D printing, also known as additive manufacturing, is a groundbreaking technology that allows for the creation of three-dimensional objects by adding material layer by layer. This process has transformed the way we design, manufacture, and prototype various products, from simple trinkets to complex machinery.
The advancements in 3D printing technology have been remarkable since its inception in the 1980s. Early 3D printers were limited in terms of materials, speed, and resolution. However, recent developments have introduced a wide array of materials, including plastics, metals, and even biological materials, expanding the potential applications for 3D printing.
Furthermore, improvements in printing speed and resolution have made it possible to create highly detailed and functional objects with greater efficiency. Today, 3D printing is used across various industries, including automotive, aerospace, healthcare, and fashion. From creating custom prosthetics to producing intricate architectural models, 3D printing has unlocked countless opportunities for innovation and creativity.
As 3D printing technology continues to advance, we can expect even more exciting possibilities in the future, such as large-scale construction, food printing, and even the fabrication of human organs for transplantation.
Discuss the growing popularity of 3D printer kits
In recent years, the popularity of 3D printer kits has surged as more individuals and businesses recognize their potential. The following paragraphs discuss the reasons for this growing interest:
Affordability is a key factor driving the popularity of 3D printer kits. As 3D printing technology has evolved and become more accessible, the cost of printers and components has decreased. Consequently, 3D printer kits have become a budget-friendly option for hobbyists, small businesses, and educational institutions looking to explore 3D printing.
Customization and educational opportunities offered by 3D printer kits also contribute to their appeal. Assembling a kit enables users to gain a deeper understanding of the printer’s mechanics and operations, laying a solid foundation for future troubleshooting and maintenance. Moreover, the ability to upgrade and tailor the printer according to personal preferences and needs has made 3D printer kits a popular choice for those seeking a more personalized printing experience.
The thriving online 3D printing community has played a significant role in the success of 3D printer kits. Numerous online forums, tutorials, and user groups make it easier for individuals to seek support, share knowledge, and collaborate on projects. This sense of community has encouraged more people to explore 3D printing through the assembly and customization of their own kits.
Finally, the versatility of 3D printer kits has boosted their popularity. With a wide range of kits available catering to various skill levels and applications, there is a suitable option for everyone, from beginners to experienced makers. This has expanded the reach of 3D printing to a broader audience and inspired more people to embrace this innovative technology.
Understanding Your 3D Printing Needs
Before diving into the world of 3D printer kits, it’s essential to evaluate your specific 3D printing needs. Taking the time to understand your requirements will help you make an informed decision when selecting the right 3D printer kit. Here are some key factors to consider:
Assessing your skill level and experience
Consider your familiarity with 3D printing technology and your experience in assembling and operating 3D printers. If you are a beginner, you might want to choose a user-friendly kit with straightforward assembly instructions and a supportive community. For more experienced users, a kit that offers advanced features and customization options may be more suitable.
Identifying your 3D printing goals and projects
Think about the types of projects you want to undertake with your 3D printer. Are you looking to create small, decorative items, or do you plan to print larger, functional objects? Understanding your goals will help you choose a kit with the appropriate build volume, print resolution, and material compatibility.
Considering your budget and available resources
Determine how much you are willing to invest in a 3D printer kit. Keep in mind that higher-quality kits and those with advanced features may come at a higher cost. Additionally, consider the ongoing expenses of 3D printing, such as filament and maintenance, when setting your budget. It’s also crucial to evaluate the space you have available for assembling and operating your 3D printer.
Support and community
The availability of support and resources is an important aspect to consider, especially if you’re new to 3D printing. Research the online community surrounding your chosen kit, including forums, tutorials, and user groups, to ensure you’ll have access to the help and guidance you may need.
By carefully assessing these factors, you will be better equipped to choose a 3D printer kit that meets your specific needs and sets you up for a successful 3D printing experience.
Key Components and Features of 3D Printer Kits
When selecting a 3D printer kit, it’s essential to have a solid understanding of the key components and features that can impact your printing experience. Here are some crucial elements to consider:
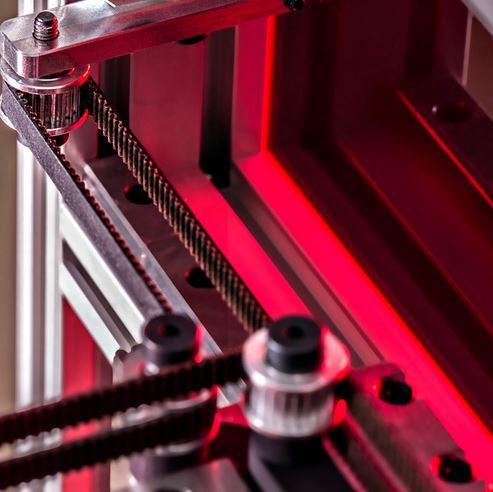
Frame and structure
The frame provides stability and support for the printer. A sturdy frame, typically made from metal or acrylic, will ensure more accurate and stable prints. Look for kits with strong, durable frames designed to minimize vibrations and maintain alignment during printing.
Print bed and build volume
The print bed is the surface on which the 3D objects are printed. It can be heated or non-heated, with heated beds providing better adhesion for certain materials. The build volume refers to the maximum size of objects that can be printed. Choose a kit with a print bed and build volume suitable for your intended projects.
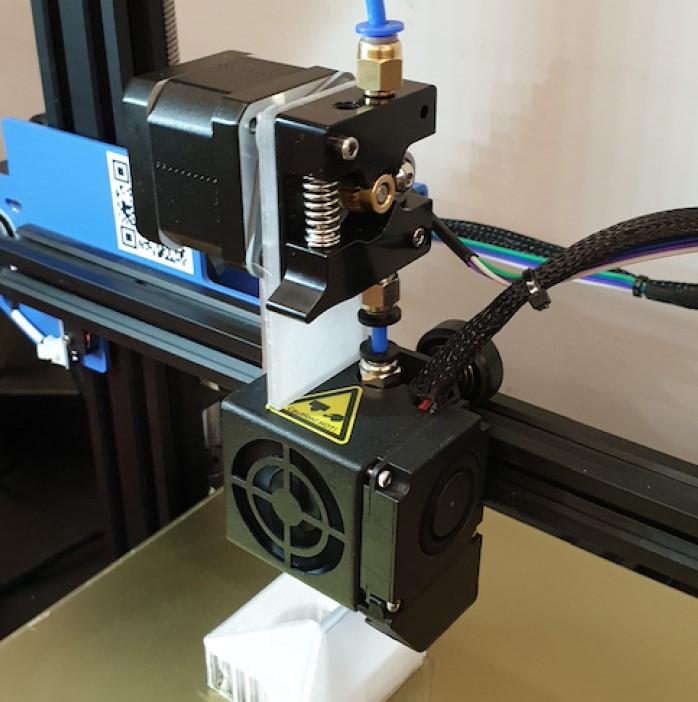
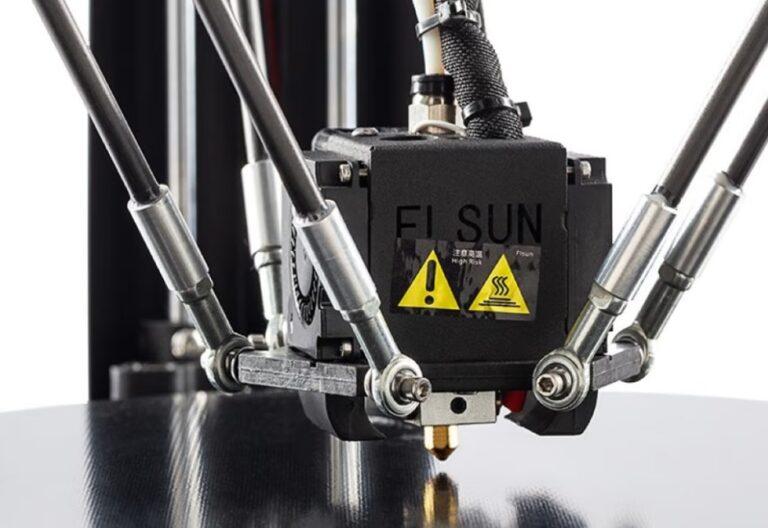
Extruder and hotend
The extruder is responsible for feeding the filament into the hotend, which melts the material and deposits it onto the print bed. A reliable extruder and hotend system will ensure smooth and consistent filament flow, resulting in better print quality. Consider a kit with a high-quality extruder and hotend that can handle a variety of materials.
Print resolution and speed
Print resolution refers to the level of detail achievable in a printed object, while print speed determines how quickly the object can be printed. Higher resolutions typically result in slower print speeds. Consider your priorities (detail versus speed) when selecting a 3D printer kit with appropriate resolution and speed capabilities.
Filament compatibility
Different 3D printer kits may be compatible with various filament materials, such as PLA, ABS, PETG, or even more specialized materials like wood-filled or metal-filled filaments. Consider your printing goals and the types of materials you plan to use when selecting a kit with the appropriate filament compatibility.
Software and connectivity
The 3D printer kit should be compatible with popular slicing software that converts 3D models into instructions for the printer. Additionally, consider the connectivity options, such as USB, SD card, or Wi-Fi, for transferring files to the printer.
By understanding the key components and features of 3D printer kits, you can make a more informed decision and choose a kit that best aligns with your needs and goals.
Upgradeability and customization options
Upgradeability and customization options are important factors to consider when choosing a 3D printer kit. These features allow users to enhance the performance and capabilities of their printers as their needs evolve or as new technologies emerge. Opting for a kit with a modular design and widely available parts can make it easier to implement upgrades, such as swapping in a more advanced extruder, adding a heated bed, or upgrading the control board. Additionally, customization options can enable users to fine-tune their printer settings and tailor the printing process to their specific requirements. By selecting a 3D printer kit that offers upgradeability and customization options, users can ensure their printer remains relevant and adaptable to their changing needs over time.
Top 3D Printer Kit Brands and Models to Consider
When searching for the perfect 3D printer kit, it’s helpful to consider some of the top brands and models available on the market. These options have earned their reputations through quality, performance, and user satisfaction. One popular choice is the Creality Ender 3, known for its affordability, reliability, and large online community. Another well-regarded option is the Prusa i3 MK3S+, which boasts high-quality components, excellent print resolution, and a strong reputation for performance and support. Finally, the Anycubic Mega S offers a user-friendly experience with its easy assembly, robust construction, and compatibility with a variety of filament types. By exploring these top 3D printer kit brands and models, you can find the perfect fit for your needs, skill level, and budget.
A brief overview of reputable 3D printer kit manufacturers
Prusa i3 MK3S
This is a popular 3D printer kit brand that offers high-level precision and accuracy in printing. It is also easy to assemble and comes with a user-friendly interface.
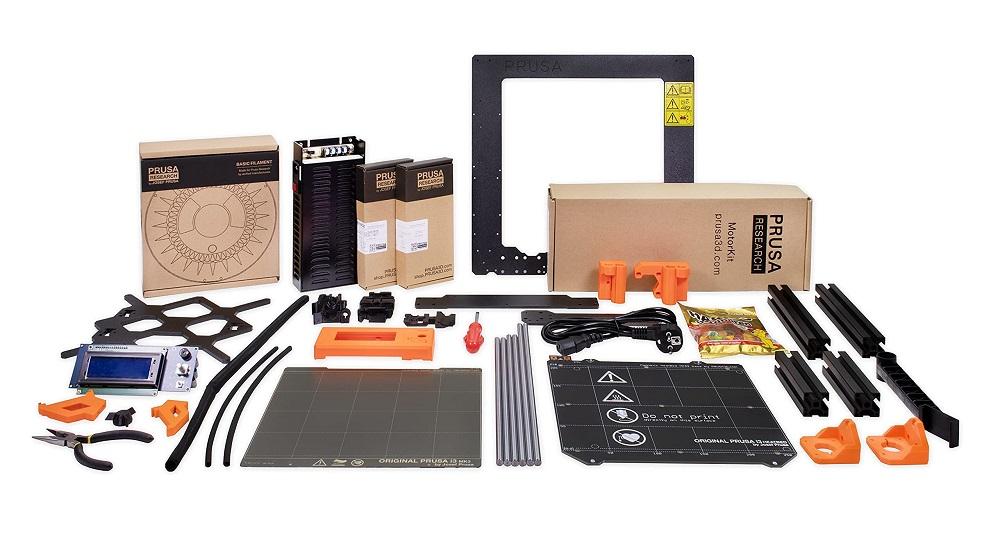
The Prusa i3 MK3S is a highly-regarded 3D printer kit with several notable strengths and a few minor weaknesses. In the following paragraphs, we will discuss these points in detail.
Strengths
- Print quality: The Prusa i3 MK3S delivers impressive print quality with high-resolution capabilities. The precise extrusion and well-tuned print settings ensure consistently excellent results.
- Ease of assembly: The kit comes with clear instructions and well-organized components, making assembly straightforward even for beginners.
- Support and community: Prusa Research, the company behind the i3 MK3S, provides excellent customer support. The active online community also offers helpful resources and guidance for users.
- Upgradability: The i3 MK3S features a modular design, allowing for easy upgrades and customization as needed. This adaptability ensures the printer remains relevant over time.
- Advanced features: This printer includes a variety of advanced features, such as automatic bed leveling, filament runout detection, and power loss recovery, enhancing the overall user experience.
Weaknesses
- Price: The Prusa i3 MK3S is more expensive than some other 3D printer kits on the market. This higher price may be a barrier for those on a tight budget.
- Build volume: The build volume of the i3 MK3S is relatively modest compared to some other printers. This limitation may be an issue for users looking to print larger objects.
- Noise level: Although improved compared to earlier models, the i3 MK3S can still be noisy during operation. This may be a concern for users in shared or quiet environments.
In conclusion, the Prusa i3 MK3S is a well-rounded 3D printer kit with several strengths that outweigh its minor weaknesses. Its high print quality, ease of assembly, and advanced features make it a popular choice among 3D printing enthusiasts.
Creality Ender 3
This brand offers an affordable and versatile 3D printing kit that is perfect for beginners. It has a robust structure and provides high-quality printing capabilities.
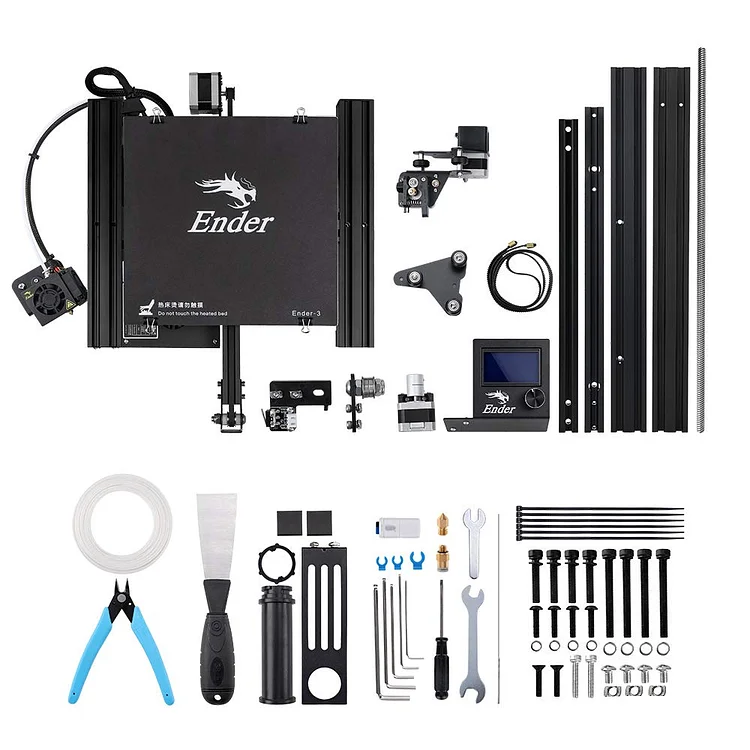
The Creality Ender 3 is a popular 3D printer kit with a range of strengths and a few weaknesses. In the following paragraphs, we will discuss these points in detail.
Strengths
- Affordability: The Ender 3 is known for its competitive price, making it an attractive option for beginners or those on a budget.
- Print quality: Despite its lower price, the Ender 3 offers impressive print quality, producing detailed and accurate prints.
- Community and support: The Ender 3 has a large online community, providing resources, guidance, and troubleshooting assistance for users.
- Upgradability: The printer’s open-source design allows for easy customization and upgrades, giving users the flexibility to improve their printer over time.
- Assembly: While the Ender 3 requires some assembly, the process is relatively simple, with clear instructions provided.
Weaknesses
- Manual bed leveling: Unlike some other printers, the Ender 3 does not include automatic bed leveling, which may be challenging for some users.
- Noise level: The Ender 3 can be quite noisy during operation, which may be an issue in shared or quiet spaces.
- Quality control: Some users have reported issues with components or assembly due to quality control inconsistencies.
In summary, the Creality Ender 3 is an affordable 3D printer kit with a range of strengths that make it an attractive option, particularly for those new to 3D printing. Its affordability, print quality, and large support community outweigh its minor weaknesses, making it a popular choice for many users.
Anycubic Photon
This is a resin-based 3D printer that offers excellent print quality and accuracy. It is also easy to use and has a user-friendly interface.
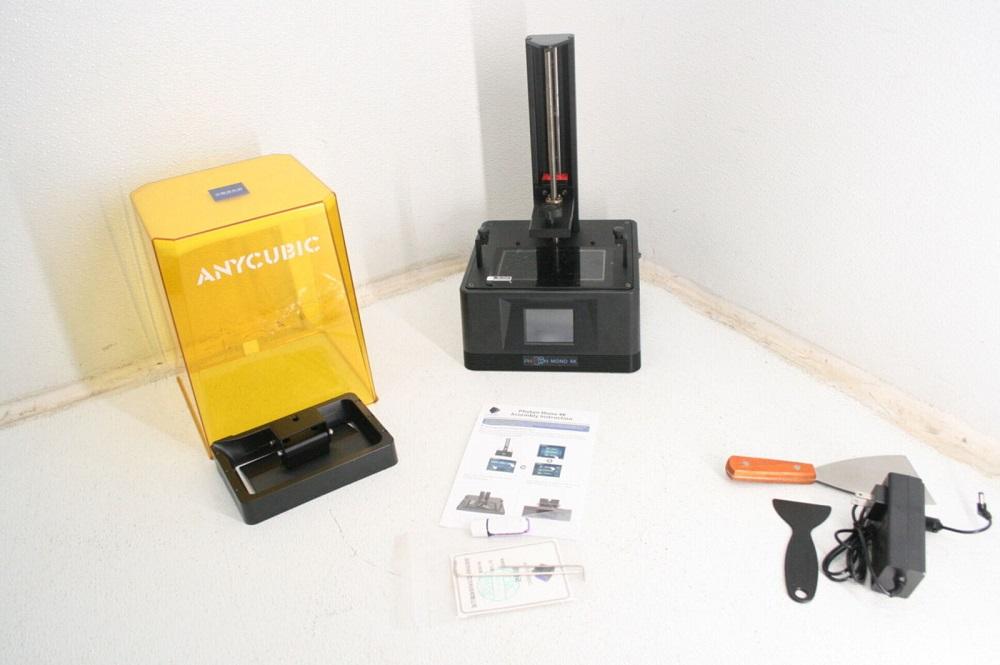
The Anycubic Photon is a popular resin-based 3D printer kit with several strengths and a few weaknesses. In the following paragraphs, we will discuss these points in detail.
Strengths
- Print quality: The Photon excels in print quality, producing highly detailed and accurate prints due to its SLA/DLP technology.
- Ease of use: The Anycubic Photon features a user-friendly touchscreen interface and easy-to-use slicing software, making it accessible even for beginners.
- Compact design: The printer’s compact size allows it to fit comfortably on most desktops, making it suitable for users with limited space.
- Affordable resin printing: The Photon is competitively priced, offering a cost-effective entry point into resin-based 3D printing.
- Active community: Anycubic Photon has a supportive online community that provides helpful resources, tips, and troubleshooting assistance.
Weaknesses
- Resin handling: Working with resin can be messy and requires proper safety precautions, which may be a drawback for some users.
- Limited build volume: The Photon’s build volume is smaller compared to some FDM printers, potentially limiting the size of prints.
- Post-processing: Resin prints require additional post-processing, such as washing and curing, which adds time and effort to the overall process.
In conclusion, the Anycubic Photon is a strong option for those looking to venture into resin-based 3D printing. Its high print quality, ease of use, and affordability make it an attractive choice, despite the few drawbacks associated with resin printing.
Geeetech A10
This is an easy-to-assemble 3D printer kit that provides high-quality printing capabilities. It is also durable and comes with a versatile design that allows for easy modification and customization.
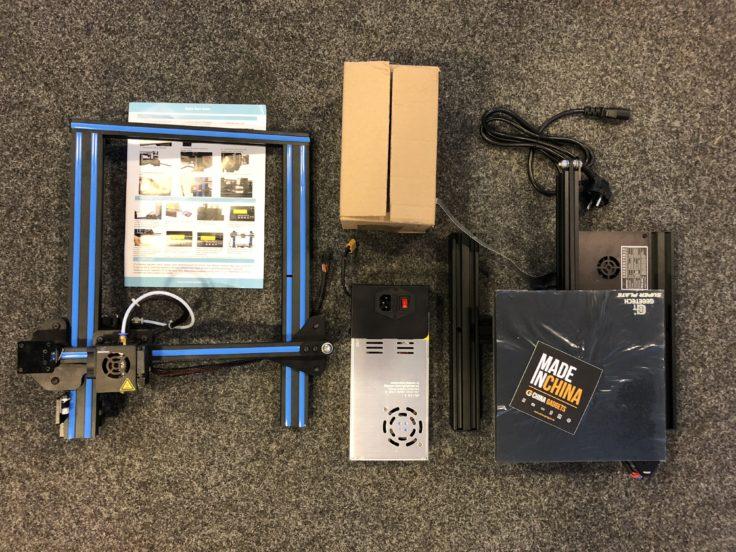
The Geeetech A10 is an entry-level 3D printer kit with a variety of strengths and a few weaknesses. In the following paragraphs, we will discuss these points in detail.
Strengths
- Affordability: The A10 is competitively priced, making it an attractive option for beginners or those on a budget.
- Print quality: Despite its lower price point, the Geeetech A10 delivers good print quality, producing detailed and accurate prints.
- Easy assembly: The A10 comes partially assembled, making it simple to put together for users with little experience.
- Open-source design: The printer’s open-source nature allows for customization, upgrades, and access to a large community for support.
- Large build volume: The A10 offers a generous build volume, enabling users to print larger objects compared to some other budget printers.
Weaknesses
- Manual bed leveling: The Geeetech A10 does not include an automatic bed leveling feature, which may be challenging for some users.
- Noise level: The A10 can be quite noisy during operation, potentially causing issues in shared or quiet environments.
- Quality control: Some users have reported inconsistencies in component quality, leading to potential issues during assembly or operation.
In summary, the Geeetech A10 is a budget-friendly 3D printer kit with several strengths that make it an appealing option for those new to 3D printing. Its affordability, print quality, and ease of assembly outweigh its minor weaknesses, making it a popular choice for many users.
Monoprice Maker Select
This 3D printer kit brand offers a great range of features, including an adjustable bed and an open-source design. It also provides high-quality printing and is relatively easy to assemble.
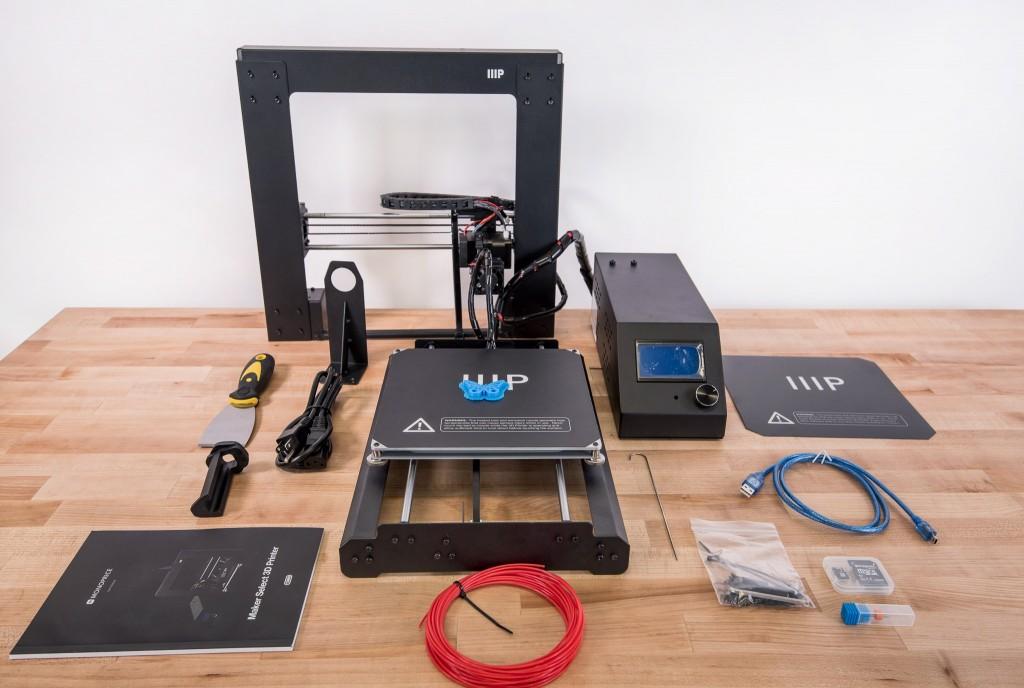
The Monoprice Maker Select is a budget-friendly 3D printer kit with several strengths and a few weaknesses. In the following paragraphs, we will discuss these points in detail.
Strengths
- Affordability: The Maker Select is priced competitively, making it an appealing choice for beginners or those on a budget.
- Print quality: Despite its lower price point, the Monoprice Maker Select delivers good print quality and accuracy, making it suitable for various projects.
- Ease of assembly: The Maker Select comes partially assembled, allowing for a relatively simple setup process even for inexperienced users.
- Large build volume: The printer offers a generous build volume compared to some other budget printers, enabling users to create larger prints.
- Strong community support: The Monoprice Maker Select has a dedicated user community that provides helpful resources, tips, and troubleshooting assistance.
Weaknesses
- Manual bed leveling: The Maker Select lacks an automatic bed leveling feature, which may be challenging for some users.
- Noise level: The printer can be quite noisy during operation, potentially causing disturbances in shared or quiet spaces.
- Quality control: Some users have reported inconsistencies in component quality, leading to potential issues during assembly or operation.
In conclusion, the Monoprice Maker Select is a budget-friendly 3D printer kit with several strengths that make it an appealing choice for those entering the world of 3D printing. Its affordability, print quality, and ease of assembly outweigh its minor weaknesses, making it a popular option for many users.
FlashForge Creator Pro
This 3D printer kit brand offers excellent printing capabilities and a high level of accuracy. It also has a durable frame and comes with user-friendly software.

The FlashForge Creator Pro is a mid-range 3D printer kit with a variety of strengths and a few weaknesses. In the following paragraphs, we will discuss these points in detail.
Strengths
- Dual extrusion: The Creator Pro features a dual extruder, allowing users to print with multiple materials or colors in a single print.
- Print quality: The FlashForge Creator Pro delivers excellent print quality and accuracy, making it suitable for various projects.
- Enclosed design: The printer’s enclosed design helps maintain a stable printing environment, improving print quality and reliability.
- Compatibility: The Creator Pro is compatible with a wide range of filaments, providing users with greater flexibility in their choice of materials.
- Strong community support: The FlashForge Creator Pro has a dedicated user community that offers helpful resources, tips, and troubleshooting assistance.
Weaknesses
- Price: The Creator Pro is more expensive than some other printer kits, potentially making it less appealing for beginners or those on a budget.
- Noise level: The printer can be noisy during operation, which may be a concern in shared or quiet environments.
- Software limitations: Some users have reported limitations in the printer’s proprietary slicing software, although it is possible to use alternative programs.
In summary, the FlashForge Creator Pro is a feature-rich 3D printer kit with several strengths that make it an attractive choice for those looking for a more advanced printing experience. Its dual extrusion, print quality, and enclosed design outweigh its minor weaknesses, making it a popular option for users seeking greater versatility and performance.
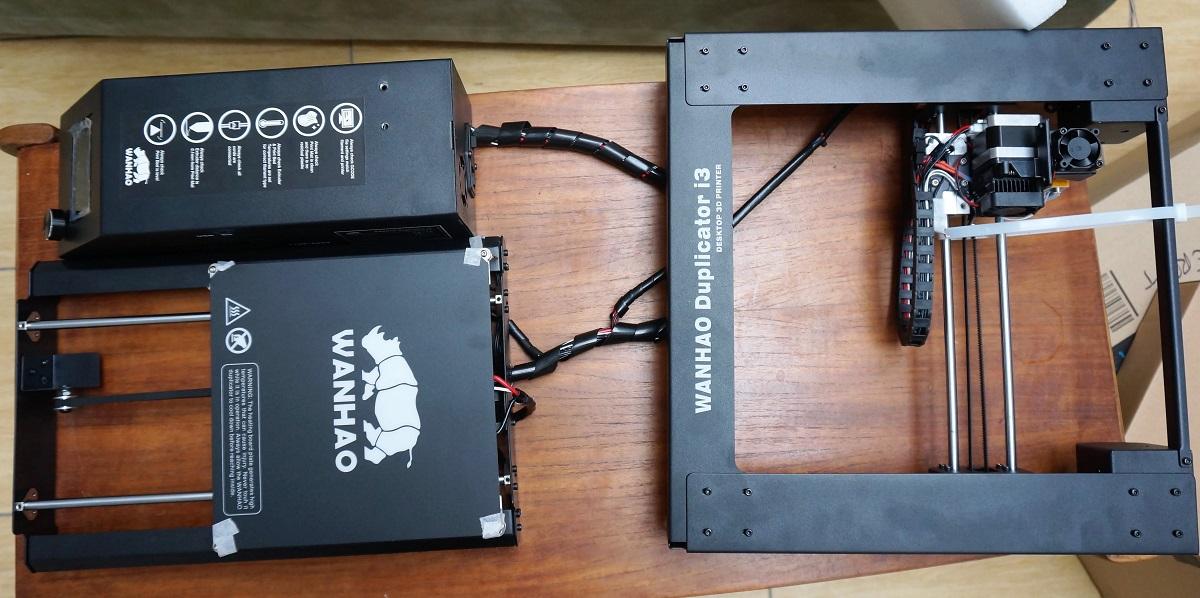
Wanhao Duplicator i3
This is a budget-friendly 3D printer kit brand that offers high-quality prints and is straightforward to assemble.
The Wanhao Duplicator i3 is a budget-friendly 3D printer kit with a variety of strengths and a few weaknesses. In the following paragraphs, we will discuss these points in detail.
Strengths:
- Affordability: The Duplicator i3 is competitively priced, making it an appealing option for beginners or those on a budget.
- Print quality: Despite its lower price point, the Wanhao Duplicator i3 delivers good print quality and accuracy, making it suitable for various projects.
- Ease of assembly: The Duplicator i3 comes partially assembled, allowing for a relatively simple setup process even for inexperienced users.
- Open-source design: The printer’s open-source nature allows for customization, upgrades, and access to a large community for support.
- Compatibility: The Duplicator i3 is compatible with a wide range of filaments, providing users with greater flexibility in their choice of materials.
Weaknesses:
- Manual bed leveling: The Wanhao Duplicator i3 does not include an automatic bed leveling feature, which may be challenging for some users.
- Noise level: The Duplicator i3 can be quite noisy during operation, potentially causing issues in shared or quiet environments.
- Quality control: Some users have reported inconsistencies in component quality, leading to potential issues during assembly or operation.
In conclusion, the Wanhao Duplicator i3 is a budget-friendly 3D printer kit with several strengths that make it an appealing choice for those new to 3D printing. Its affordability, print quality, and ease of assembly outweigh its minor weaknesses, making it a popular option for many users.
Comparison of popular 3D printer kit models for various needs and budgets
| 3D Printer Kit | Price Range | Build Volume | Notable Features | Strengths | Weaknesses |
|---|---|---|---|---|---|
| Prusa i3 MK3S | Mid-Range | 250x210x210mm | Auto bed leveling, Filament sensor | High quality, Reliability | Slightly higher price |
| Creality Ender 3 | Budget | 220x220x250mm | Easy assembly, Large build volume | Affordable, Good print quality | Manual bed leveling |
| Anycubic Photon | Mid-Range | 115x65x155mm | Resin-based, High-resolution prints | Precision, Detail | Smaller build volume, Odor |
| Geeetech A10 | Budget | 220x220x260mm | Auto bed leveling, Open-source | Affordable, Easy to assemble | Some quality control issues |
| Monoprice Maker Select | Budget | 200x200x180mm | Large build volume, Open-source | Affordable, Good print quality | Manual bed leveling, Noise |
| FlashForge Creator Pro | Mid-Range | 227x148x150mm | Dual extrusion, Enclosed design | Print quality, Versatility | Price, Noise, Software |
| Wanhao Duplicator i3 | Budget | 200x200x180mm | Open-source, Wide filament range | Affordable, Good print quality | Manual bed leveling, Noise |
Tips for Assembling and Fine-Tuning Your 3D Printer Kit
When embarking on the exciting journey of assembling and fine-tuning a 3D printer kit, it’s essential to understand the steps and best practices involved. A well-assembled and calibrated 3D printer ensures high-quality prints and a smooth printing experience. In this section, we will discuss tips on preparing your workspace and tools, following assembly instructions and seeking online support, and calibrating your printer for optimal performance. By following these guidelines, you will be well-equipped to build and fine-tune your 3D printer kit successfully.
Preparing your workspace and tools
Before starting the assembly process, it is crucial to prepare a clean, organized workspace. Ensure you have ample lighting and a comfortable area to work in. Gather all necessary tools, such as screwdrivers, pliers, and Allen wrenches. Additionally, make sure you have the 3D printer kit manual and any required software at hand.
Following assembly instructions and seeking online support
Carefully follow the assembly instructions provided by the manufacturer. Patience and attention to detail are key when assembling a 3D printer kit. If you encounter difficulties or need clarification, seek help from online forums, user groups, or the manufacturer’s support team. Remember, the 3D printing community is often eager to assist fellow enthusiasts.
Calibrating and fine-tuning your 3D printer for optimal performance
After assembling your 3D printer, calibration and fine-tuning are essential for optimal performance. Firstly, level the print bed to ensure proper adhesion and print quality. Next, adjust the printer’s firmware settings, such as print speed, temperature, and layer height, based on the filament type and desired print quality. Finally, perform test prints and make any necessary adjustments to achieve the best results. Throughout this process, don’t hesitate to seek guidance from online resources and community forums.
In conclusion, assembling and fine-tuning a 3D printer kit requires patience, attention to detail, and willingness to learn. By preparing your workspace, following instructions, and calibrating your printer, you will be on your way to successful 3D printing experiences.
Safety and Maintenance Considerations
It is crucial to ensure the longevity and safety of your 3D printer. You can prevent potential risks and keep your printer operating at its best by putting in place suitable safety precautions and routine maintenance procedures. Assembling and using your 3D printer safely is covered in this part, along with routine maintenance and troubleshooting advice. By adhering to these rules, you may improve the life and performance of your 3D printer while also establishing a secure environment.
Staying safe while assembling and operating your 3D printer
Safety is a priority when working with 3D printers. Always read the manufacturer’s guidelines and follow their recommendations for safe assembly and operation. During assembly, use caution when handling sharp tools and heated components. When operating your 3D printer, be aware of potential hazards, such as high temperatures and moving parts. Keep the workspace well-ventilated and avoid leaving the printer unattended during long print sessions. Furthermore, maintain a safe distance from the printer to prevent accidental contact.
Regular maintenance and troubleshooting tips
Proper maintenance ensures the longevity and reliability of your 3D printer. Clean the print bed regularly to prevent filament residue buildup and ensure proper adhesion. Check for debris and dust accumulation on moving parts, and lubricate bearings and rods as needed. Regularly inspect belts and pulleys for wear and tension, adjusting them as required.
When troubleshooting issues, consult the printer’s manual or online resources for guidance. Familiarize yourself with common issues and their solutions, such as filament jams, poor print quality, and bed leveling problems. In case of persistent problems, don’t hesitate to seek assistance from the manufacturer or the 3D printing community.
In conclusion, maintaining a safe environment and regularly caring for your 3D printer will enhance its performance and extend its lifespan. By staying vigilant during assembly and operation and practicing proper maintenance, you can enjoy a rewarding and successful 3D printing experience.
Conclusion
This blog post has discussed a number of topics related to 3D printer kits, including their rising popularity, how to identify your 3D printing requirements, the essential elements and features of these kits, and a comparison of several well-liked models. We also offered advice on how to put together and perfect your 3D printer kit, as well as important safety and upkeep considerations.
Recap the key points discussed in the blog post
To sum up, 3D printer kits provide an accessible and customizable approach to start using 3D printing. Users may successfully maintain, troubleshoot, and upgrade their equipment by choosing the proper kit and gaining insightful knowledge about the workings of the printer. To ensure best performance and long-term durability, it is essential to take safety precautions when setting up and using a 3D printer.
Encourage readers to start customizing their 3D printing experience with the perfect 3D printer kit
You may choose the ideal 3D printer kit to fit your requirements and preferences thanks to the variety of options available. We urge you to delve into the fascinating world of 3D printing and personalize your journey with the right equipment. Start using 3D printing right now to take advantage of the educational opportunities and creative possibilities it offers.
How to Assemble Your 3D Printer Kit Step-by-Step?
- Unpack and Organize Components
Carefully unpack all the components of your 3D printer kit and organize them on a clean, flat workspace. Verify that you have all the necessary parts listed in the assembly manual.
- Assemble the Frame
Follow the assembly manual to construct the frame of the 3D printer, ensuring that it is square and level. Proper alignment of the frame is crucial for overall printer stability and performance
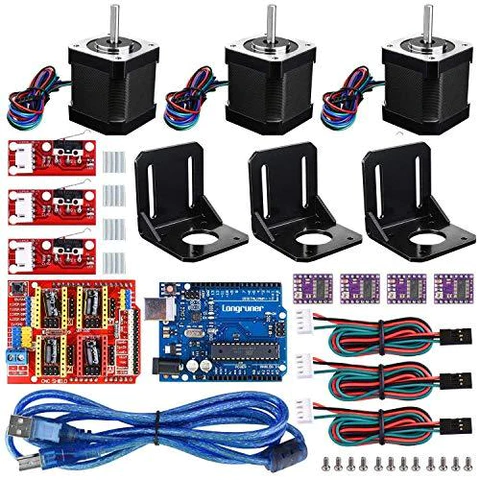
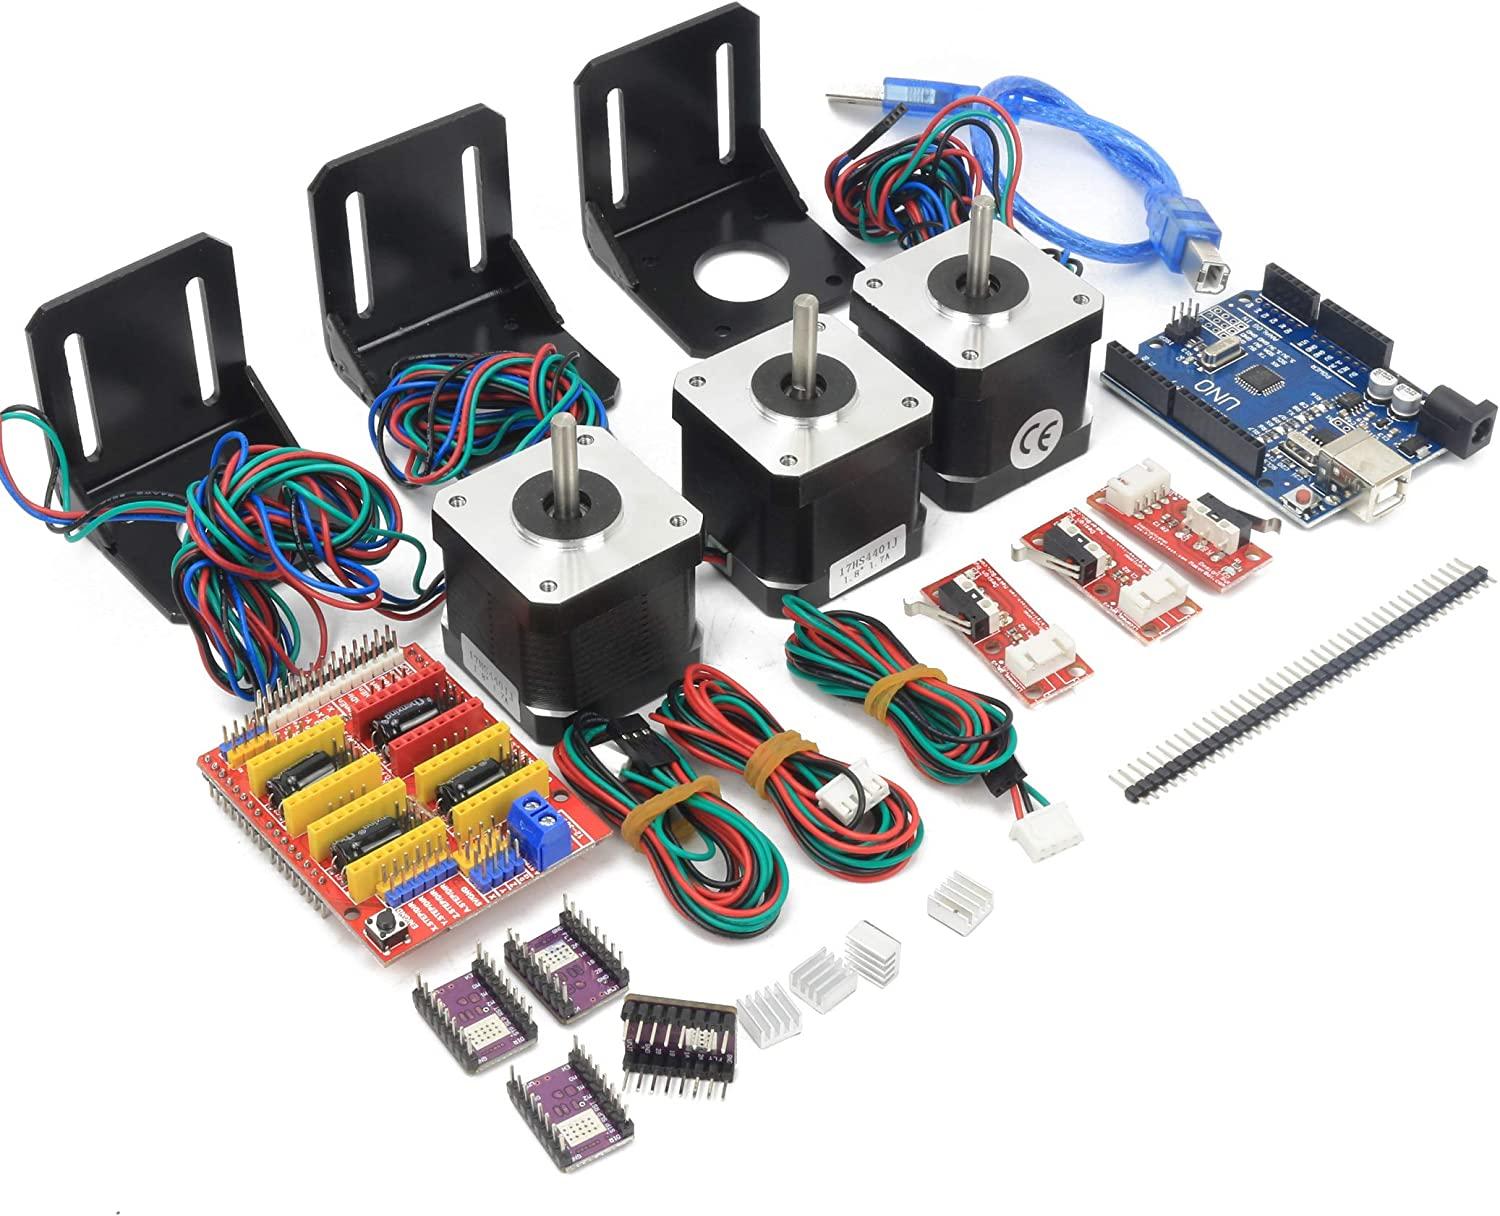
- Install the Motors and Linear Motion System
Mount the stepper motors and assemble the linear motion system (such as the belts, pulleys, and rails) according to the instructions. Ensure that all components move smoothly and are securely fastened.
- Assemble the Extruder and Hotend
Put together the extruder and hotend assembly, making sure to properly align the components and attach any necessary cooling fans, thermistors, or heating elements.
- Attach the Print Bed Description
Install the print bed onto the linear motion system, making sure it is level and securely fastened. This is critical for achieving successful prints and maintaining print quality.
- Install the Electronics and Wiring Description
Follow the assembly manual to connect the electronics, such as the main control board, power supply, and any additional sensors or components. Carefully route and secure all wiring to avoid tangling or damage during printer operation.
- Calibrate the 3D Printer
Once the assembly is complete, calibrate the printer according to the manufacturer’s instructions. This includes leveling the print bed, setting the nozzle height, and adjusting any other necessary settings.
- Perform a Test Print
Load the filament and start a test print to ensure that the printer is functioning correctly. This test will help identify any potential issues or adjustments that may be necessary for optimal performance.
FAQs
Assembly times vary depending on the complexity of the kit and your experience level. For most kits, it can take anywhere from a few hours to a couple of days to complete the assembly. Be patient and take your time to ensure the best results.
While prior experience is helpful, it is not required. Many 3D printer kits come with detailed instructions and online support, making it possible for beginners to assemble and operate the printer successfully.
Yes, many 3D printer kits offer upgrade options and customization possibilities. Common upgrades include installing a better extruder, adding a heated bed, or improving the printer’s overall stability with frame reinforcements.
Regular maintenance is essential for keeping your 3D printer in good working condition. Some tasks, like cleaning the print bed and nozzle, should be done after each print. Other tasks, such as lubricating the linear motion system and checking belt tension, can be done every few weeks or months, depending on usage.
If you run into problems during assembly, consult the user manual and any available online resources for guidance. Many 3D printer kits have active online communities where users share tips, solutions, and support for assembly and operation. Don’t hesitate to reach out for help when needed.