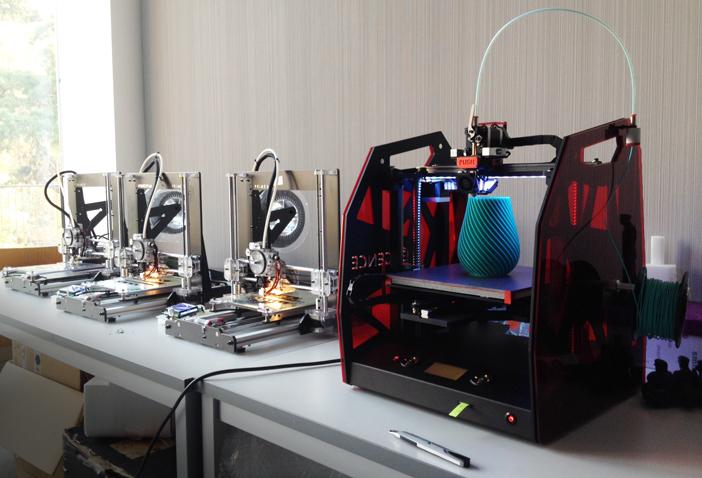
Introduction
Under extrusion is a prevalent issue in the world of 3D printing that can significantly affect the quality and strength of printed objects. In this blog post, we will explore various tips and techniques to help you overcome under-extrusion, resulting in better 3D print quality. By addressing this common problem, you can ensure that your prints are both visually appealing and structurally sound.
We will begin by gaining a deeper understanding of what under-extrusion is, its causes, and its impact on your prints. Next, we will provide guidance on adjusting printer settings, inspecting and maintaining your printer, selecting the right filament, and fine-tuning your slicer settings. Our goal is to equip you with the knowledge and confidence to tackle under-extrusion head-on, ultimately enabling you to produce high-quality 3D prints consistently.
Importance of addressing under-extrusion
Addressing under extrusion is crucial for several reasons, all of which contribute to the overall success and quality of your 3D prints. In the following paragraphs, we will discuss the importance of addressing under-extrusion.
First, under-extrusion directly impacts the visual appearance of your prints. Prints suffering from under-extrusion often exhibit visible gaps between lines, rough surfaces, and uneven layering. These aesthetic flaws can be disappointing, especially when you have invested time and effort into designing and preparing your 3D models. By tackling under-extrusion, you can significantly improve the look of your finished prints.
Second, under-extrusion affects the structural integrity of your printed objects. Insufficient filament extrusion can result in weak or brittle parts that are prone to breaking or failing under stress. This is particularly problematic if you are printing functional parts or components that must withstand regular use. Addressing under-extrusion ensures that your prints are not only visually appealing but also durable and robust.
Lastly, addressing under extrusion can improve the overall efficiency of your 3D printing process. Ignoring this issue may lead to failed prints, wasted filament, and additional time spent troubleshooting and reprinting. By resolving under-extrusion, you can minimize print failures and save valuable time and resources.
In conclusion, addressing under-extrusion is vital for achieving high-quality, reliable, and efficient 3D printing results. By understanding and addressing this common issue, you can enhance both the appearance and performance of your printed objects.
Overview of tips to improve print quality
This blog post will provide you with an overview of some suggestions for reducing under-extrusion to enhance the print quality of your 3D prints. This advice is intended to give you the skills and information necessary to properly address this widespread problem. The main objective is to raise the caliber and dependability of your prints.
We’ll start by discussing how crucial changing a printer’s settings are. You may avoid under-extrusion and get better print quality by making sure that your printer’s parameters, such as the filament diameter, extrusion multiplier, and printing temperature, are tailored for the particular filament you’re using.
The importance of checking and maintaining your printer will then be covered. You can prevent under-extrusion and achieve more consistent results by performing a routine cleaning of the extruder gear and checking for hot end obstructions.
We will also stress how crucial it is to select the proper filament for your 3D printing creations. Better prints can be obtained by preventing under-extrusion with high-quality filament and adequate storage.
The importance of fine-tuning your slicer settings will be discussed last. To prevent under-extrusion and enhance print quality, precise slicing profiles and modifications to layer height and line width can make a significant impact.
Following these suggestions and being aware of the major causes of under extrusion will greatly improve the quality of your 3D prints, producing items that are both aesthetically pleasing and structurally sound.
Understanding Under-Extrusion
To effectively address under-extrusion, it is essential first to understand what it is and identify its common causes. Under-extrusion occurs when the 3D printer does not extrude enough filament during the printing process, resulting in thin, weak, or incomplete layers. This issue can have several negative impacts on the quality and functionality of your printed objects.
One common cause of under extrusion is improper printer settings. For instance, incorrect filament diameter, extrusion multiplier, or printing temperature settings can lead to inadequate filament flow. Therefore, it is crucial to verify that your printer settings are optimized for your specific filament type.
Additionally, hardware issues can contribute to under-extrusion. Dirty or worn-out extruder gears may not grip the filament properly, and blockages in the hot end can obstruct the flow of melted filament. Regular inspection and maintenance of your printer’s extruder and hot end can help prevent under-extrusion related to hardware issues.
Moreover, filament quality and storage conditions can also affect under-extrusion. The low-quality filament may not extrude consistently, while moisture-absorbing materials can swell and cause extrusion problems. To minimize under-extrusion caused by filament issues, it is essential to use high-quality filaments and store them in a dry environment.
In conclusion, understanding the causes of under-extrusion and its impact on print quality is the first step in effectively addressing this common 3D printing issue. By identifying the factors contributing to under-extrusion and implementing the appropriate solutions, you can improve the quality and reliability of your 3D prints.
Definition and common causes
In this section, we will provide a clear definition of under-extrusion and discuss its common causes. Understanding these factors will enable you to better diagnose and address under-extrusion in your 3D printing projects.
Definition of Under-Extrusion: Under-extrusion occurs when a 3D printer does not extrude sufficient filament during the printing process, leading to thin, weak, or incomplete layers. This problem can negatively impact the appearance, strength, and functionality of your printed objects.
Common Causes of Under-Extrusion:
- Printer Settings:
- Incorrect filament diameter
- Improper extrusion multiplier
- Unsuitable printing temperature or speed
- Hardware Issues:
- Dirty or worn extruder gear
- Blockages in the hot end
- Inconsistent filament feeding mechanism
- Filament Quality and Storage:
- Poor-quality filament
- Moisture absorption from improper storage
- Inconsistent filament diameter
By clearly defining under-extrusion and identifying its common causes, you can more effectively diagnose the issue and implement appropriate solutions. In the following sections of this blog post, we will provide tips and techniques for addressing each of these common causes, ultimately helping you improve the quality and reliability of your 3D prints.
Effects on print quality and structural integrity
Under-extrusion can have several detrimental effects on both the print quality and the structural integrity of your 3D-printed objects. By understanding these impacts, you can better appreciate the importance of addressing under-extrusion in your 3D printing projects.
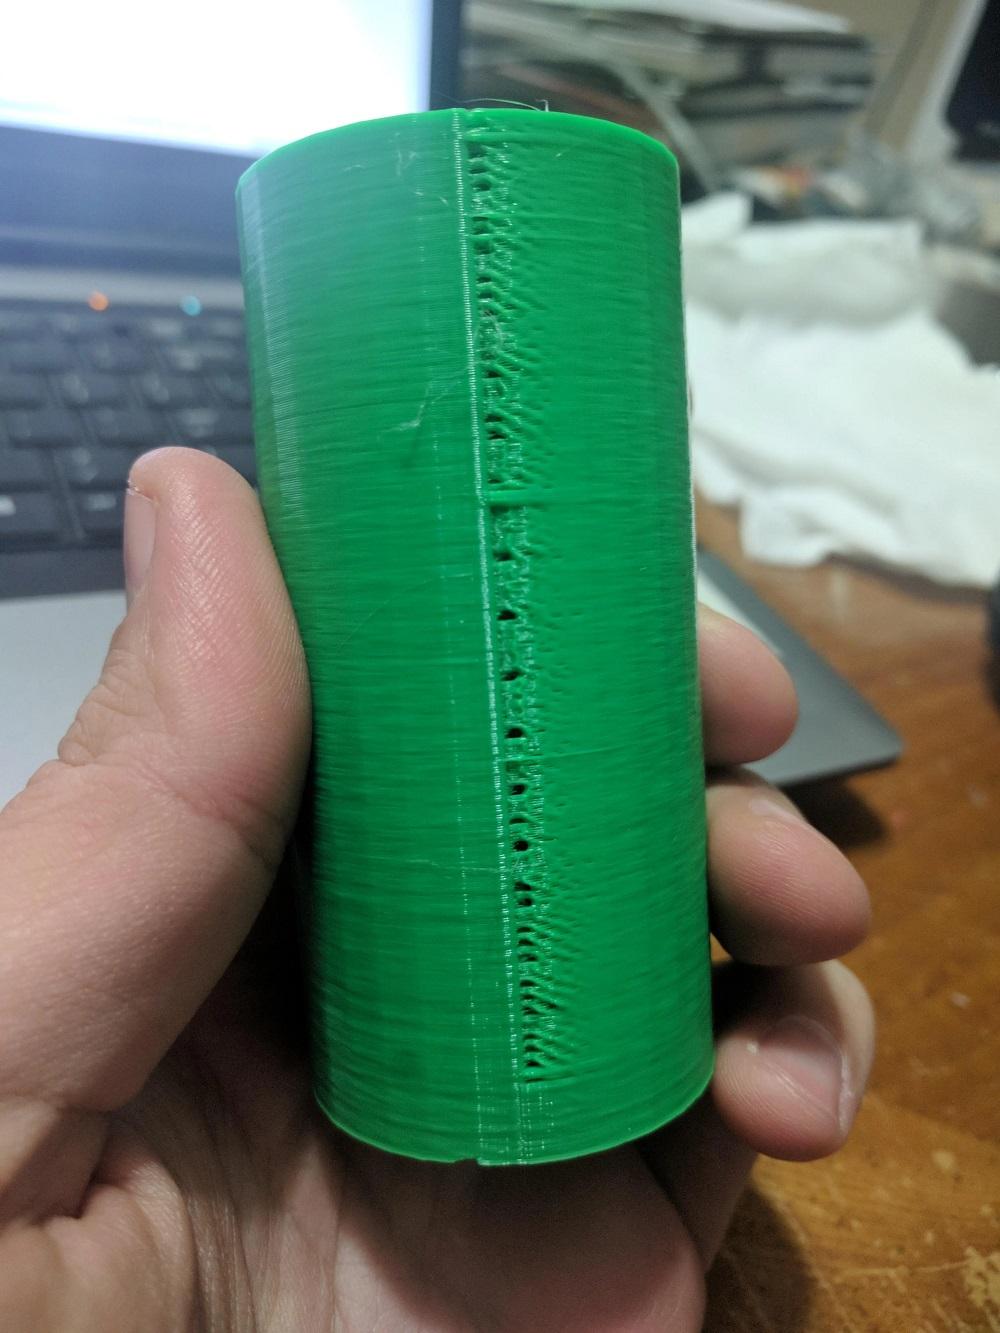
- Print Quality: Under-extrusion can lead to a variety of issues that negatively affect the visual appearance of your prints. These issues may include:
- Visible gaps between lines or layers
- Rough or uneven surfaces
- Inconsistent layer bonding or layer separation
These aesthetic flaws can be discouraging, especially when you have invested time and effort in designing and preparing your 3D models. Addressing under-extrusion helps ensure that your prints look as intended, with smooth surfaces and consistent layering.
- Structural Integrity: The structural integrity of your printed objects is also compromised when under-extrusion occurs. Some of the issues that may arise include:
- Weak or brittle parts
- Poor layer adhesion, leading to delamination
- Reduced strength and durability of the printed objects
These structural issues can be particularly problematic when printing functional parts or components that must withstand regular use or stress. By tackling under-extrusion, you can enhance the structural integrity of your prints, ensuring they are both durable and robust.
In summary, addressing under-extrusion is essential for achieving high-quality, reliable 3D prints. By understanding the impacts of under-extrusion on print quality and structural integrity, you can take the necessary steps to prevent or resolve this issue and improve your 3D printing results.
indirect impacts
Under-extrusion primarily affects print quality and structural integrity, as discussed earlier. However, there are a few other indirect impacts worth mentioning:
- Increased Material Waste: Under-extrusion can lead to failed prints, requiring you to discard the printed object and start over, wasting filament in the process. Addressing under-extrusion can help minimize waste and conserve resources.
- Time Consumption: Troubleshooting and reprinting due to under-extrusion can be time-consuming, especially if you need to test multiple settings or perform printer maintenance to resolve the issue. By preventing under-extrusion, you can save time and focus on other aspects of your 3D printing projects.
- Frustration: Dealing with under-extrusion and its consequences can be frustrating for users, particularly when print failures or quality issues occur repeatedly. Addressing under-extrusion can lead to a more enjoyable and satisfying 3D printing experience.
While the primary effects of under-extrusion relate to print quality and structural integrity, these additional indirect impacts emphasize the importance of understanding and addressing this common 3D printing issue.
Printer Settings Adjustments
Adjusting printer settings is a critical step in addressing under-extrusion and improving the quality of your 3D prints. In this section, we will discuss two essential printer settings adjustments: filament diameter and extrusion multiplier, as well as the optimal printing temperature and speed.
Filament Diameter and Extrusion Multiplier
- Filament Diameter: Ensuring that your 3D printer uses the correct filament diameter is crucial to prevent under-extrusion. Different printers and materials may require various filament diameters, such as 1.75mm or 2.85mm. Always check the manufacturer’s recommendations for your printer and filament and input the correct value in your slicing software.
- Extrusion Multiplier: The extrusion multiplier, also known as the flow rate, determines the amount of filament extruded during printing. If the extrusion multiplier is set too low, under-extrusion may occur. To resolve this issue, try increasing the extrusion multiplier in small increments (e.g., 5%) and observe the results. Fine-tune the setting until you achieve the desired balance between filament flow and print quality.
The Optimal Printing Temperature and Speed
- Printing Temperature: The printing temperature directly affects the viscosity and flow of the filament. If the temperature is too low, the filament may not melt and extrude properly, causing under-extrusion. Conversely, excessively high temperatures may lead to filament oozing and other print quality issues. Consult the filament manufacturer’s recommendations for the optimal printing temperature range and adjust accordingly.
- Printing Speed: Printing too fast can result in under-extrusion, as the extruder may struggle to keep up with the required filament flow rate. To address this issue, try reducing the printing speed in your slicing software. Start by decreasing the speed by 10-20% and observe the results. Gradually fine-tune the speed setting to achieve a balance between print quality and printing time.
By paying close attention to these printer settings adjustments, you can significantly reduce the occurrence of under-extrusion and improve the overall quality of your 3D prints. Remember to always consult the manufacturer’s recommendations for your specific printer and filament, and adjust settings accordingly to achieve the best results.
Inspecting and Maintaining Your Printer
Regular inspection and maintenance of your 3D printer play a vital role in preventing under-extrusion and ensuring consistently high-quality prints. In this section, we will discuss two essential aspects of printer maintenance: cleaning the extruder gear and checking for hot end blockages.
Cleaning the Extruder Gear
- Importance of a Clean Extruder Gear: A clean and well-functioning extruder gear is crucial for consistent filament feeding and avoiding under-extrusion. Over time, filament dust and debris can accumulate on the gear, reducing its grip on the filament and causing feeding issues.
- Cleaning Process: To clean the extruder gear, first power off and unplug your printer. Carefully disassemble the extruder assembly, following the manufacturer’s guidelines. Use a soft brush, like a toothbrush, to gently remove any debris from the extruder gear’s teeth. In some cases, a small amount of isopropyl alcohol on a cloth or cotton swab can help dissolve and remove stubborn dirt. Reassemble the extruder assembly and test the printer to ensure proper filament feeding.
Checking for Hot End Blockages
- Causes of Hot End Blockages: Blockages in the hot end can occur due to various reasons, such as filament debris, heat creep, or using incompatible materials. These blockages can impede the flow of melted filament, leading to under-extrusion.
- Identifying and Clearing Blockages: To check for hot end blockages, first heat the hot end to the appropriate temperature for the filament you are using. Carefully remove the filament and visually inspect the nozzle for any obstructions. If a blockage is present, you can try clearing it using a fine nozzle-cleaning needle or a thin wire. Alternatively, you can perform a “cold pull” by heating the hot end, inserting the filament, and then quickly cooling the hot end before pulling the filament out. This process can help dislodge any debris stuck inside the nozzle. If the blockage persists, you may need to disassemble the hot end for a more thorough cleaning or replace the nozzle entirely.
By regularly inspecting and maintaining your printer, including cleaning the extruder gear and checking for hot end blockages, you can effectively reduce the occurrence of under-extrusion and maintain the quality of your 3D prints. Always follow the manufacturer’s guidelines for printer maintenance and safety precautions.
Choosing the Right Filament
Selecting the appropriate filament is crucial for successful 3D printing and preventing under-extrusion. In this section, we will discuss the importance of filament quality and its impact on under-extrusion, as well as proper storage techniques to avoid moisture absorption.
Filament Quality and Its Impact on Under-Extrusion
- Quality Considerations: Not all filaments are created equal. Low-quality filaments can have inconsistent diameters, impurities, or poor melting characteristics, which can contribute to under-extrusion. Investing in high-quality filaments from reputable manufacturers can help reduce the likelihood of under-extrusion and improve the overall quality of your prints.
- Material Compatibility: Ensure that the filament you choose is compatible with your 3D printer’s specifications and capabilities. Some materials, like ABS or PETG, may require higher extrusion temperatures, a heated bed, or an enclosed build chamber. Consult your printer’s documentation and choose a material that matches its capabilities.
Proper Storage to Avoid Moisture Absorption
- Moisture Issues: Many filaments, especially hygroscopic materials like PLA, ABS, and Nylon, can absorb moisture from the air. This moisture can cause under-extrusion, bubbling, or weak layer adhesion during printing.
- Storage Solutions: To prevent moisture absorption, store your filaments in a dry, cool, and dark environment, ideally with airtight containers or vacuum-sealed bags. Include desiccant packets to help absorb any residual moisture. If you suspect your filament has absorbed moisture, you can try drying it in a filament dryer or a low-temperature oven before printing.
By choosing the right filament, paying attention to quality, and ensuring proper storage to avoid moisture absorption, you can significantly reduce the risk of under-extrusion and enhance the quality of your 3D prints. Always consult the manufacturer’s guidelines and recommendations for both your printer and filament to achieve the best results.
Fine-Tuning Your Slicer Settings
Optimizing your slicer settings is another essential aspect of preventing under-extrusion and improving the overall quality of your 3D prints. In this section, we will discuss the importance of accurate slicing profiles and adjustments to layer height and line width.
Importance of Accurate Slicing Profiles
- Role of Slicing Profiles: Slicing profiles are sets of parameters that define how your 3D printer will create the final print. These settings include layer height, line width, printing speed, and temperature, among others. A well-tuned slicing profile can significantly reduce the occurrence of under-extrusion and improve print quality.
- Customizing Profiles: While many slicing software packages come with pre-defined profiles for specific printers and materials, it’s essential to fine-tune these profiles for your specific printing conditions. Experiment with different settings, print test objects, and iterate until you find the optimal parameters for your printer and material combination.
Layer Height and Line Width Adjustments
- Layer Height: The layer height determines the thickness of each printed layer and can impact the overall print quality and printing time. A lower layer height generally results in higher print quality but requires a longer printing time. However, excessively low layer heights can lead to under-extrusion, as the extruder struggles to deposit the right amount of filament. To prevent under-extrusion, ensure that your layer height is within the recommended range for your printer and material.
- Line Width: The line width refers to the width of each extruded line in a printed layer. If the line width is too narrow, it can cause under-extrusion, as there might not be enough filament to properly bond the layers together. Conversely, a too-wide line width can lead to over-extrusion and other print quality issues. Adjust the line width setting in your slicing software to find the optimal balance between filament flow and print quality.
By carefully fine-tuning your slicer settings, including creating accurate slicing profiles and adjusting layer height and line width, you can effectively reduce under-extrusion and achieve better 3D print quality. Always test and iterate to find the best settings for your specific printer, material, and printing conditions.
Conclusion
As we reach the end of this article, it’s essential to recap the key tips discussed and encourage further experimentation and improvement in your 3D printing journey.
Recap of the Key Tips
- Understand under-extrusion and its common causes, as well as its effects on print quality and structural integrity.
- Make necessary adjustments to printer settings, such as filament diameter, extrusion multiplier, printing temperature, and speed.
- Inspect and maintain your printer by cleaning the extruder gear and checking for hot end blockages.
- Choose high-quality filament and store it properly to avoid moisture absorption.
- Fine-tune your slicer settings by creating accurate slicing profiles and adjusting layer height and line width.
Encouragement for Experimentation and Improvement
3D printing is a constantly evolving technology, and there is always room for growth and improvement. Don’t be afraid to experiment with different settings, materials, and techniques to find the optimal configuration for your specific printing needs. By following the tips and recommendations provided in this article, you can effectively tackle under-extrusion issues and achieve better print quality in your 3D printing projects.
Remember, patience and persistence are key in the world of 3D printing. With the right approach and dedication, you can overcome under-extrusion and other challenges to create stunning and high-quality 3D-printed objects. Happy printing!
How to Identify Signs of Under-Extrusion?
A step-by-step guide on recognizing the visual and structural indicators of under-extrusion in your 3D prints. By following these steps, you can effectively identify signs of under-extrusion in your 3D prints and take the necessary steps to prevent it in the future.
- Check the Surface Quality
Inspect the surface of your 3D print for rough patches, gaps, and other signs of inconsistency. Under-extrusion can lead to these imperfections in the print’s surface.
- Examine the Layers
Analyze the layers of the print to check for gaps and weak bonding between layers. This is a common indicator of under-extrusion, where the extruder fails to deposit enough filament to form a strong bond between layers.
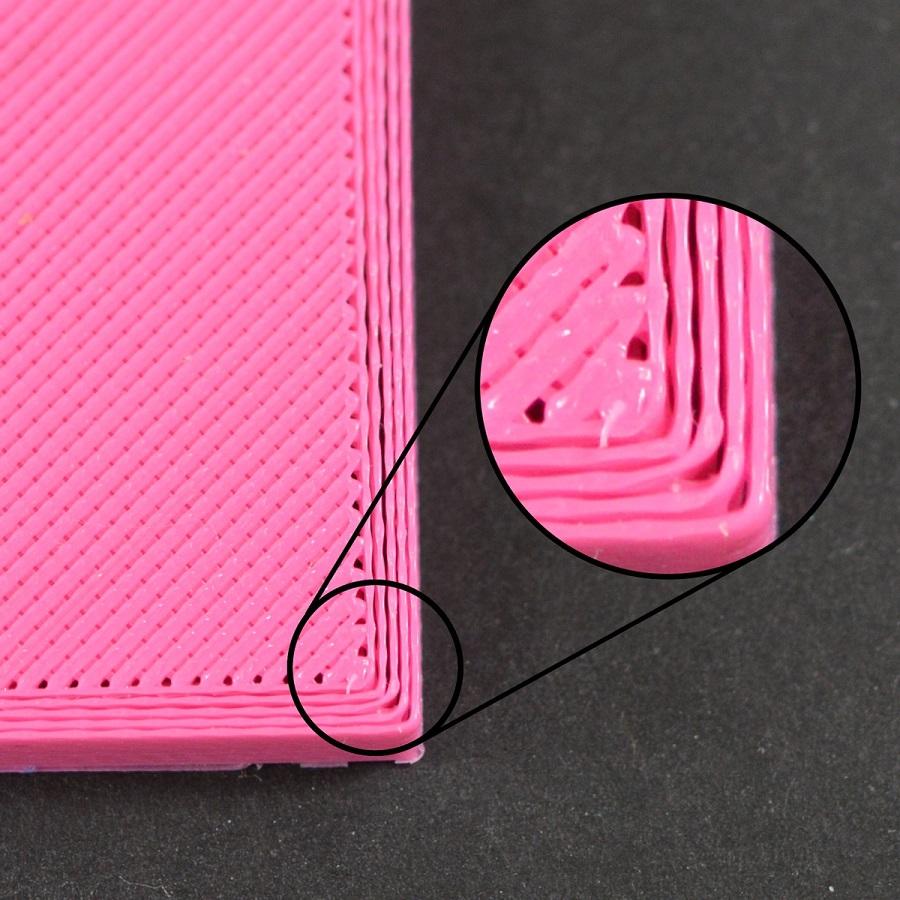
- Check the Infill
Look at the infill of the 3D print to see if it’s consistent and properly filled in. Under-extrusion can cause gaps and holes in the infill, which can weaken the overall structure of the print.
- Evaluate the Top Layers
Inspect the top layers of the 3D print to check for uniformity and proper filling. If the top layers are thin and spotty, it could be an indicator of under-extrusion.
- Measure the Dimensional Accuracy
Use calipers to measure the dimensional accuracy of the 3D print. If the print is smaller than it should be, it could be due to under-extrusion.
- Experiment with Different Settings
If you notice signs of under-extrusion, experiment with different printer settings such as filament diameter, printing temperature, and extrusion multiplier to find the optimal configuration for your specific printer and material.
FAQs
The primary cause of under-extrusion is a lack of sufficient filament flow, which can be caused by various factors such as clogged nozzle, improper extruder calibration, or insufficient printer settings.
Yes, under-extrusion can be fixed by adjusting the printer settings, calibrating the extruder, cleaning the extruder gear, or using high-quality filament.
Under-extrusion can lead to gaps, rough patches, and weak bonding between layers, which can significantly affect the quality and structural integrity of 3D prints.
Under-extrusion does not usually cause damage to the printer but can lead to clogged nozzles or other issues if left unresolved.
It’s recommended to inspect and maintain your 3D printer regularly, such as cleaning the extruder gear and checking for hot end blockages every few prints or as needed.
Choose high-quality filament that is compatible with your printer and stored properly to avoid moisture absorption. Filament diameter and extrusion multiplier should also be calibrated accurately to prevent under-extrusion.