Introduction
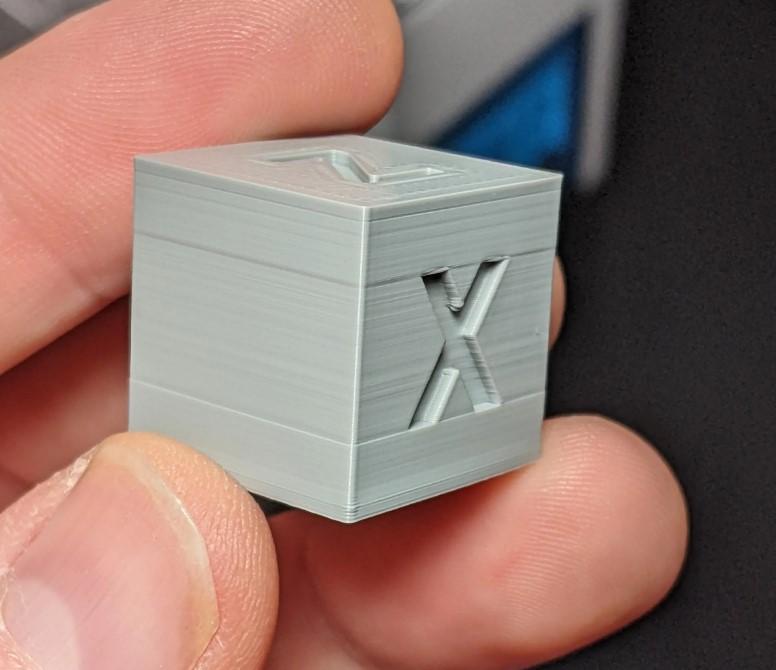
An essential tool in the realm of 3D printing is a calibration cube. This tiny cube-shaped device serves as a calibration tool for 3D printers to make sure they are producing precisely. The most popular calibration cube is a cube with the dimensions 20mm x 20mm x 20mm. Calibration cubes exist in a variety of sizes and shapes.
Although using a calibration cube is a straightforward procedure, it does need patience and attention to detail. You can get high-quality prints and avoid problems like warped or misaligned layers by correctly calibrating your printer with a calibration cube.
This blog post will go into the realm of calibration cubes, covering topics like their usage, types, importance, printer settings, maintenance, and troubleshooting advice. You will have a thorough understanding of calibration cubes and how to utilize them to improve your 3D printing accuracy for faultless outcomes at the end of this article. So let’s get started!
What is a Calibration Cube?
A calibration cube is a 3D-printed object that is used to ensure that a 3D printer is printing accurately. It is typically a small cube that is printed using specific settings designed to produce consistent and accurate results. The cube’s dimensions are precisely calibrated to measure 20mm x 20mm x 20mm, which allows it to serve as a reference point for other prints. Calibration cubes can also be used to test and adjust other settings on a 3D printer, such as extrusion rate, temperature, and bed leveling. Proper calibration is essential for achieving high-quality prints and avoiding issues such as warped or misaligned layers. By using a calibration cube, you can improve your 3D printing accuracy and achieve flawless results every time.
Importance of Calibration Cube in 3D Printing
In 3D printing, the accuracy and precision of the final output are crucial. Calibration cubes play a vital role in achieving these qualities by providing a standard reference for calibrating the 3D printer. They ensure that the printer is printing the right size and shape of the object as specified in the design. Calibration cubes are essential in detecting and correcting errors in the printer settings that may affect the quality of the printed object. Moreover, using a calibration cube can prevent issues such as under-extrusion, over-extrusion, and warped layers, which can compromise the final output. In summary, calibration cubes are critical in ensuring that 3D printers produce high-quality and accurate prints consistently.
Types of Calibration Cubes
Types of Calibration Cubes include single-wall, multi-wall, solid, hollow, and asymmetric. Each type serves a unique purpose in calibrating a 3D printer’s accuracy and precision. Single-wall cubes are the most basic and easy to print, while multi-wall and solid cubes provide greater accuracy. Hollow and asymmetric cubes are more complex and can help identify specific calibration issues. Understanding the different types of calibration cubes can help you choose the right one for your needs and ensure flawless 3D printing results.
- Single-wall calibration cube: It is a cube with a single-wall thickness, which means it has only one outer layer. This type of calibration cube is used to calibrate the extrusion width and measure the flow rate of the filament.
- Multi-wall calibration cube: It is a cube with multiple walls and infill layers. This type of calibration cube is used to calibrate the printer’s extrusion multiplier, as well as check the printer’s dimensional accuracy and overhang performance.
- Solid calibration cube: It is a cube with a solid infill pattern, meaning the interior is completely filled. This type of calibration cube is used to check the printer’s dimensional accuracy and overhang performance.
- Hollow calibration cube: It is a cube with a hollow infill pattern, meaning the interior is not completely filled. This type of calibration cube is used to check the printer’s bridging performance and extrusion consistency.
- Asymmetric calibration cube: It is a cube with an asymmetric shape, meaning it is not symmetrical on all sides. This type of calibration cube is used to check the printer’s dimensional accuracy and layer adhesion at different angles and orientations.
Standard Calibration Cube
A standard calibration cube is a simple 3D-printed object used to calibrate 3D printers. It typically has a cubic shape, with each side measuring a specific length. The cube is used to check the accuracy and precision of the printer’s movements and to adjust its settings accordingly. The standard calibration cube is often used as a benchmark for comparing the performance of different printers or print settings. Its simplicity and universality make it an essential tool for any 3D printing enthusiast.
- XYZ Calibration Cube
- 20mm Calibration Cube
- 25mm Calibration Cube
- 30mm Calibration Cube
- 40mm Calibration Cube
- 50mm Calibration Cube
Advanced Calibration Cube Designs
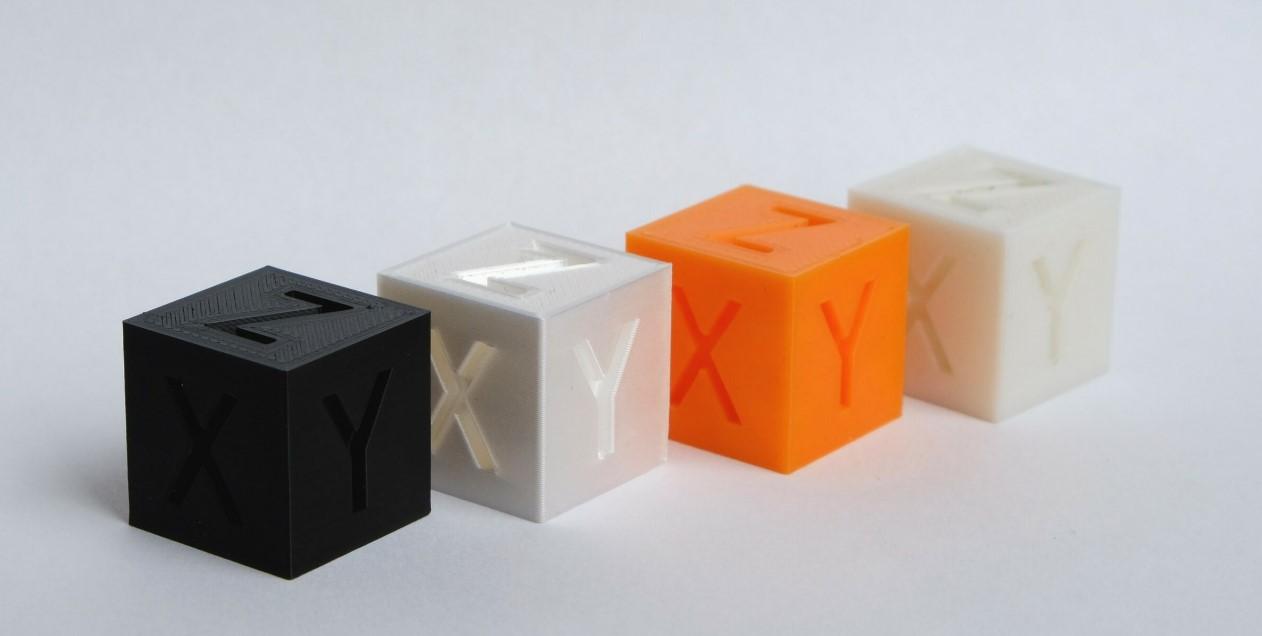
Advanced Calibration Cube Designs offer a range of unique shapes and features to enhance 3D printer accuracy. Some designs include corner brackets, curved edges, and angled surfaces. These advanced cubes are often used for fine-tuning printers for specific applications, such as creating complex geometries or printing high-resolution models. They require precise printing and calibration, but can greatly improve print quality and performance. Examples of advanced calibration cube designs include the XYZ cube, the tapered cube, and the octagonal cube. Experimenting with different designs can help achieve the best results for your 3D printing projects.
XYZ cube
The XYZ cube is a popular calibration tool used in 3D printing that features evenly spaced marks in the X, Y, and Z directions. By printing and measuring the XYZ cube, 3D printer users can determine any dimensional errors in their prints and adjust their printer settings accordingly.
tapered cube
The tapered cube is a calibration tool designed to detect under or over-extrusion issues. As its name suggests, the tapered cube has a tapered shape that allows users to check the flow of the extruder by examining the thickness of the printed layers. If the layers are thicker at the bottom and thinner at the top, there may be an over-extrusion issue. If the layers are thinner at the bottom and thicker at the top, there may be an under-extrusion issue.
octagonal cube
The octagonal cube is a calibration tool that features eight sides with varying shapes and angles. It is designed to test the dimensional accuracy of 3D printers in a variety of different orientations. By printing and measuring the octagonal cube, users can detect any discrepancies in their printer’s dimensional accuracy and make necessary adjustments. Additionally, the octagonal cube can also help users identify any mechanical issues in their printer, such as loose belts or warped frames.
How to Use a Calibration Cube
Calibration cubes are essential tools for achieving accurate 3D prints. To use a calibration cube, first print one with your 3D printer. Next, measure the cube’s dimensions with calipers. Compare the measurements to the intended dimensions of the cube to determine the printer’s accuracy. Adjust the printer’s settings as needed to improve accuracy. Repeat the process until the printer produces accurate prints. It’s also important to note that calibration cubes should be used regularly to ensure continued accuracy in 3D prints. By following these steps and regularly using a calibration cube, you can achieve flawless 3D prints with ease.
Printer Preparation
Printer preparation is a critical step before calibrating your 3D printer. Start by checking the printer’s components, such as the bed leveling, nozzle, and filament. Ensure the printer’s firmware is up-to-date and that the correct slicing settings are applied. Clean the bed surface and remove any debris that could interfere with the calibration process. Heat the printer bed and extruder to the recommended temperatures. Finally, load the calibration cube file into your slicer software and send the print command to your printer.
Calibration Process
Calibrating your 3D printer is an important process to ensure that your prints come out accurately and consistently. Here are the steps you need to follow:
- Prepare the printer bed by cleaning it thoroughly and making sure it is level.
- Choose a calibration model, such as a cube, that is appropriate for your printer and the filament you are using.
- Print the calibration model and make note of any errors or issues that arise during the printing process.
- Measure the dimensions of the printed model using a caliper or ruler.
- Compare the dimensions of the printed model to the intended dimensions of the calibration model.
- Adjust your printer settings, such as the extruder temperature or printing speed, to correct any discrepancies between the printed model and the intended model dimensions.
- Print the calibration model again and repeat the measuring and adjusting process until the printed model matches the intended dimensions.
It is important to keep in mind that the calibration process may need to be repeated periodically, as environmental factors and wear and tear on the printer can affect its accuracy over time. By following these steps and regularly calibrating your printer, you can ensure that your 3D prints are of the highest quality.
Analyzing the Results
Now that the calibration cube has been printed and measured, it’s time to examine the data. First, examine the cube’s shape for any obvious flaws or irregularities, such as bulges, warping, or uneven edges. Then, evaluate whether any printer settings need to be changed by comparing the dimensions of each side of the cube to the intended dimensions. It’s also crucial to take into account any outside influences, such as temperature or humidity, that might have had an impact on the print. The calibration procedure and analysis should then be repeated as many as necessary to produce the desired outcomes. The calibration cube’s data should be accurately analyzed to provide consistent and superior 3D printers.
Calibration Cube and Printer Settings
Despite the fact that calibration cubes are an essential tool for creating accurate 3D printers, the process requires more steps than simply manufacturing the cube. Before printing, make sure the printer settings are right because they have a big impact on calibration.
The print bed should first be calibrated, and the printer’s temperature settings should be reviewed. Next, check that the extruder is accurately calibrated because this can affect how precisely the print will come out.
When the printer is fully configured, it is time to print the calibration cube. Choose the cube design that most closely matches your needs, then print it with the settings you’ve determined to be most efficient.
After printing, measure the cube’s dimensions with calipers and compare them to the estimated values. Use the data to change the printer’s parameters, then repeat the process until the cube is printed accurately.
By allowing you to measure the width, height, and length of the object at the same time rather than doing so individually, using two calipers increases the likelihood that your measurements will be correct. This lowers the possibility of measuring errors and increases the measurement’s general accuracy. Furthermore, having two calipers makes manipulating the object being measured simpler because one caliper may hold it in place while the other takes the measurements.
Remember that calibration is a continual process and that it could occasionally need to be repeated if the printer’s configuration changes or if printer components start to wear out.
Extrusion Rate
The amount of filament that is melted and forced out of the nozzle of the 3D printer per unit of time is known as the extrusion rate. It has a significant impact on the printed object’s quality. You may change the printing speed, nozzle diameter, and temperature to alter the extrusion rate. An extrusion rate that is too high could result in over-extrusion, giving the printed product rough surfaces and subpar dimensional accuracy. However, a decreased extrusion rate could lead to under-extrusion, which would leave gaps and uneven layer adhesion. Therefore, determining the ideal extrusion rate is essential for producing prints of good quality. By enabling you to gauge the printed object’s real dimensions and comparing them to the desired ones, calibration cubes can help you fine-tune the extrusion rate.
Temperature
An important element that has an impact on the 3D print’s quality is temperature. It may have an impact on the filament’s melting point and extrusion rate. Depending on the printer and the type of filament, a different temperature is ideal. Utilizing a temperature that falls within the range suggested by the filament manufacturer is crucial. Too high of a temperature can result in over-extrusion, stringing, and warping, while too low of a temperature can lead to under-extrusion and poor layer adhesion. Both on the printer and in the slicer software, the temperature can be changed. To find the ideal temperature for a particular filament and printer, it is advised to do a temperature calibration test.
To perform a temperature calibration test, a calibration cube is printed with a specific temperature tower model. The temperature tower model is designed to have different temperature levels on each layer. The cube is then printed at various temperatures, and the layers are examined to determine which temperature produced the best print quality. The results are analyzed to determine the optimal printing temperature for that particular printer and filament. This process helps ensure that the temperature settings are correct for producing high-quality prints.
Bed Leveling
Bed leveling is an important process for ensuring the first layer of a 3D print adheres correctly to the print bed. It involves adjusting the position of the print bed to ensure it is perfectly level and at the correct distance from the nozzle. To start the process, the printer should be homed and the calibration cube placed on the print bed. The bed should then be lowered until the nozzle is touching the cube, and the height adjusted using the bed leveling screws until the paper friction test shows the correct distance between the nozzle and bed. This process should be repeated for each corner and the center of the bed. The calibration cube can also be used to check for any inconsistencies in the bed level, as any differences in the height of the cube at different points can indicate a need for further adjustment.
Troubleshooting Guide for Calibration Cube Issues
a guide to troubleshooting calibration cube problems There are a number of things you can check to determine the cause of your calibration cube’s problems. Verify your printer’s settings and the levelness of your bed first. Try modifying your extrusion rate or temperature if it doesn’t resolve the problem. Try printing a replacement cube in case the original is defective. If none of these suggestions work, ask for assistance on online forums or from qualified technicians.
Warped or Misaligned Layers
Layers can get warped or out of alignment when the printer bed is not level, the nozzle is too near or too far from the bed, or there are problems with the printer’s extrusion or temperature settings. To begin resolving this problem, use a calibration cube or other leveling tool to make sure the printer bed is appropriately leveled. Double-checking the nozzle height as well as tweaking the temperature and extrusion rate parameters may also assist to resolve the problem.
Inaccurate Dimensions
If your 3D-printed parts are not coming out to the correct dimensions, there may be an issue with your printer’s calibration. Check that your printer’s extrusion rate, temperature, and bed level are properly calibrated. Additionally, check that you are using the correct settings for the filament material you are using. It may also be helpful to print a calibration cube and measure the dimensions to ensure accuracy.
Inconsistent Extrusion
Inconsistent extrusion can lead to various issues in 3D printing, such as gaps or over-extrusion. This can be caused by a variety of factors, including improper temperature or flow settings, clogged nozzle, or improper filament tension. To address this issue, first, ensure that the printer’s temperature and flow settings are calibrated correctly. Check for any blockages in the nozzle and clean if necessary. Finally, check the filament tension and adjust it as needed.
Tips for Calibrating Your Printer with a Calibration Cube
Calibrating your 3D printer is essential for achieving accurate and reliable prints. One popular tool for calibration is the calibration cube. Here are some tips for using a calibration cube to calibrate your printer:
- Print the cube using your printer’s default settings
- Measure the dimensions of the printed cube using a caliper
- Compare the measured dimensions to the expected dimensions of the cube
- Adjust printer settings such as extrusion rate, temperature, and bed leveling as needed
- Repeat the printing and measuring process until the dimensions of the printed cube match the expected dimensions
Additionally, here are some other tips to keep in mind when calibrating your printer:
- Make sure your printer is properly assembled and leveled
- Use high-quality filament and keep it stored properly to prevent moisture absorption
- Clean your printer’s nozzle regularly to prevent clogs and uneven extrusion
- Keep your printer’s firmware up to date for optimal performance
By following these tips and using a calibration cube, you can ensure that your printer is calibrated for accurate and consistent 3D prints.
Material Considerations
The kind of material used can have a big impact on the calibration procedure when printing with a 3D printer and using a calibration cube. The precision and consistency of the printed product can be impacted by the properties of the various materials, such as their melting temperature and flow characteristics.
For instance, whereas materials like PLA have a lower melting point and may only need lower extrusion temperatures, materials like ABS and nylon have greater melting points and may also need higher extrusion temperatures. Additionally, to maintain accuracy, the extrusion rate may need to be changed for materials like PETG that have a higher viscosity.
When calibrating a printer, it is crucial to take the material into account because it can impact both the print quality and the printer’s overall performance. The greatest calibration outcomes can be attained by experimenting with various materials and tweaking the printer settings appropriately.
Print Speed
When 3D printing, print speed can significantly affect the quality of the final print. Printing too fast can result in a poor surface finish and inaccurate dimensions, while printing too slow can cause issues such as stringing and blobbing. It is important to find the optimal print speed for your specific printer and material. Start with the manufacturer’s recommended speed and adjust gradually to find the best balance between speed and quality. Keep in mind that larger prints may require slower speeds for better quality. Additionally, using a smaller layer height can allow for faster print speeds while still maintaining good quality.
Layer Height
Layer Height is an important parameter in 3D printing that determines the thickness of each layer. Choosing the right layer height can significantly impact the final quality of your print. It’s important to consider factors such as the printer’s capabilities, the model’s complexity, and the desired level of detail. A layer height that is too thick can result in a rough and grainy surface, while a layer height that is too thin can lead to longer print times and potential clogging of the printer’s nozzle. Experimenting with different layer heights can help you find the optimal setting for your specific needs.
Maintaining Calibration
Maintaining Calibration is an important aspect of 3D printing. To ensure consistent and accurate prints, you should regularly check and adjust your printer’s calibration settings. This includes leveling the bed, calibrating the extruder, and checking the filament diameter. Keeping your printer clean and well-maintained can also help maintain calibration. It’s a good idea to keep track of any changes you make to your calibration settings, so you can easily revert back to previous settings if needed. Regularly printing calibration objects, such as a calibration cube, can also help you identify any calibration issues and make necessary adjustments. By taking these steps, you can ensure that your printer stays calibrated and produces high-quality prints.
How Often Should You Calibrate Your Printer?
To ensure precise and consistent printing, calibrate your printer. The model of the printer, how it is operated, and the material being used can all affect how often calibration is required. Before beginning a new project or whenever you notice any problems with your prints, it is normally advised to calibrate your printer. Additionally, routine upkeep and cleaning help keep your printer calibrated and operating efficiently. In order to get the required results, it’s crucial to keep an eye on the print quality and modify calibration as necessary.
Factors Affecting Calibration Stability
Calibration stability can be affected by a variety of factors. Environmental factors such as temperature and humidity can cause changes in the printer’s performance, as can the age and condition of the printer itself. The quality and type of filament being used can also impact calibration stability. Other factors to consider include the frequency of use, the level of maintenance performed on the printer, and any modifications made to the printer’s hardware or software. It’s important to take all of these factors into account when trying to maintain calibration stability.
Factors affecting calibration stability:
- Temperature and humidity
- Age and condition of the printer
- Quality and type of filament
- Frequency of use
- Level of maintenance
- Modifications to hardware or software
Conclusion
In conclusion, calibrating your 3D printer is crucial for achieving accurate and consistent prints. By using a combination of techniques and tools, such as a calibration cube, you can adjust various settings to optimize your printer’s performance. Some factors, such as temperature and humidity, can affect calibration stability, so it’s important to monitor and adjust as needed. Regular calibration is necessary, but the frequency will depend on how often you use your printer and the specific materials you’re printing with. Remember to document your calibration process and keep notes for future reference. With patience and attention to detail, you can achieve high-quality prints every time.
How to use a calibration cube to test your 3D printer’s accuracy?
- Print a calibration cube
First, download a calibration cube file and print it on your 3D printer. Make sure to use the same settings and filament you typically use for your prints.
- Measure the cube
Use a caliper to measure the dimensions of the cube’s walls, top, and bottom. Record the measurements.
- Compare the measurements
Compare the recorded measurements to the expected measurements of the cube. The expected measurements can be found in the file description or by calculating them based on the cube’s design.
- Adjust printer settings
If the measurements are not accurate, adjust the printer settings such as the flow rate, extrusion multiplier, or layer height. Reprint the cube and measure again.
- Repeat the process
Repeat the above steps until the cube’s measurements are accurate. This will ensure that your 3D printer is calibrated and producing accurate prints.
FAQs
A calibration cube is a small, simple object that is printed on a 3D printer to test its accuracy. It is important to use one to ensure that the printer is producing prints that are accurate and consistent.
It is recommended to calibrate your 3D printer with a calibration cube every time you change your filament or make any significant changes to your printer settings.
While there are other objects that can be used to test a 3D printer’s accuracy, a calibration cube is the most commonly used and reliable object for this purpose.
Yes, a calibration cube can be used to calibrate any type of 3D printer, regardless of its make or model.
If your calibration cube test shows that your printer is not accurate, you may need to adjust your printer settings or perform maintenance on your printer to improve its accuracy. It is also possible that there is a hardware issue that needs to be addressed.